


I have always disliked Terminal. I got a basic grounding in Unix command-line usage in a C++ class in college, but Terminal still bugs me. Yes, I can adjust colors and fonts in the preferences, but it isn’t the background color that bothers me; it’s the fact that I can never tell my prompt apart from my output.
This became particularly aggravating when I recently started using Git. Git, unfortunately, does not have a great GUI client on the Mac that I’ve found, so I was doing all my work on the command line and determining where the prompt ended and output began was getting to be a persistent problem. I also was not happy with the fact that almost any command besides a simple cd or ls was wrapping onto multiple lines; the default Terminal prompt just takes up so much horizontal space.
Fortunately, it is possible to modify your bash prompt, and having trolled the internet and tested various solutions, here’s what I’m currently using to distinguish prompt from output:
Yes, my computer is named Tastefully Delicious. I myself am not entirely certain how this occurred.
My custom prompt isn’t perfect, and it’s certainly a lot more basic than some that you can create, but it does a great job of visually distinguishing between input and output which is exactly what I needed. Fortunately, it’s not terribly difficult to enable something like this; although bash prompt examples around the internet range from gibberish to hundreds of lines of cryptic functions that you have to load into your bash session, understanding the basics of a custom bash prompt in order to make your own peace with Terminal is quite simple.
First off, head over to IBM’s cheat sheet for bash prompt modification. This was by far the best reference I found on modifying the prompt, and offers a complete listing of available bash sequences and colors (as an added bonus, it uses a much simpler syntax for colors than some other sites advise). In my examples below I’ll be using the specific variables for my personal prompt, but you can of course substitute any bash sequence that you like to make the command line your own.
There are two main parts to customizing your prompt: deciding on the right prompt declaration for you, and then writing it to a file so that it’s loaded every time you load bash. The prompt is stored in the PS1 variable in bash, which you can examine like this:
echo $PS1To temporarily change the variable (for instance, while testing out various prompts), you’ll run something like this:
export PS1="Your prompt here > "By adding bash sequences to your prompt, you can make it display more interesting information. For instance, if you wanted to use just the second line of my prompt (what folder you’re in, what computer you’re logged into, and what user account you’re using), you could enter this:
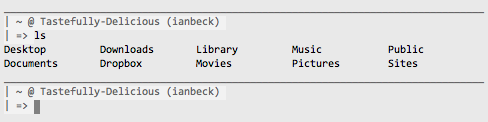
export PS1="\W @ \h (\u) \$ "Which would result in a prompt that reads something like this:

You can, of course, use any of the sequences listed on the IBM reference. For myself, I found that changing the content of the prompt itself wasn’t enough (even when I experimented with multi-line prompts); what was really needed was some color.
Colors in bash are rather offputting, but easy enough to use as long as you’re careful. The basic format is \e[0m — “\e[” starts the color code, 0 is the actual color declaration (0 specifically means “reset to default”), and “m” ends the color. However, in order to make sure bash wraps things right (should they need wrapping) you have to add some backslash-escaped brackets to mark the code as taking up no space on the line:
\[\e[0m\]Fun, illegible times. In the color chart on IBM’s reference, you can see the various codes associated with different colors. To setup a specific color combination, separate different numeric color codes with semicolons (so far as I know, order doesn’t matter). So if you wanted red text on a black background you would use \[\e[31;40m\] and if you wanted bold green text on a blue background you’d use \[\e[1;32;44m\] (the number 1 makes the text bolder and/or brighter for use on a dark background). You can also leave off any of the color codes (to just set the background color without messing with the default text color, for instance).
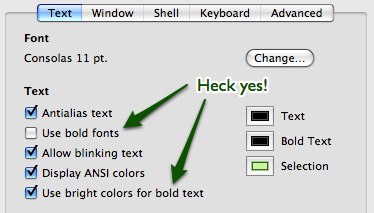
For my prompt I wanted something more subtle than most of the bash colors provide for, so I set the background of the whole window to light gray in the Terminal preferences, and then used the code \[\e[1;30;47m\] which set the text to the bright variant of black on a white background. I wasn’t too happy with the bold text, but fortunately Terminal offers a pair of options to disable bold text and make it “bright” which worked perfectly for me:
With colors worked out, the last step was adding a horizontal rule (via underscores) to separate out the prompt even more. My default Terminal window is 80 characters wide, so I just tossed in 80 underscores. I’m certain there are ways to get tricky with functions and only output as many underscores as you need to fill the window, but that seemed like more effort (and processing overhead) than it was worth.
So without further ado, my complete custom bash prompt:
export PS1="\[\e[1m\]________________________________________________________________________________\n\[\e[1;30;47m\]| \W @ \h (\u) \n| => \[\e[0m\]"There’s additionally a second level prompt that you may need if you’re entering a command over multiple lines. I just duplicated the final line of my original prompt for the secondary one:
export PS2="\[\e[1;30;47m\]| => \[\e[0m\]"For both of them, note the “return to default” color code at the end; if you don’t enter that, you’ll end up with an entire window the color of your prompt, which will likely defeat the purpose.
Once you’ve found a prompt that you like, you’ll want to save it so that it automatically loads. To do this, just add the export commands to a hidden file in your home folder named either “.bash_profile” or “.bashrc” (I don’t have any idea what the difference is; I’m personally using .bash_profile because it already existed in my home folder).
Once you’ve saved your path to the file, you should forevermore experience a more visually appealing (and possibly informative) bash prompt, hopefully rendering Terminal a less painful program to use.
Nice prompt. I especially like the divider line. I recently revamped my prompt:
http://flickr.com/photos/incanus/2474268884/
If you’re curious, the string is:
\[\e[30;1m\]–(\[\e[0m\]\u\[\e[30;1m\]@\[\e[0m\]\H\[\e[30;1m\])–(\[\e[0m\]\j\[\e[30;1m\]|\[\e[0m\]\l\[\e[30;1m\])–(\[\e[0m\]\d\[\e[30;1m\]|\[\e[0m\]\T\[\e[30;1m\])— — -\n\[\e[30;1m\]–(\[\e[0m\]\w\[\e[30;1m\])–(\[\e[0m\]$
Posted 10:53 PM on Feb. 4, 2009 ↑
Cool post. I’l try to ignore its terribly Mac-centric theme.
I personally prefer to keep the number of lines my prompt takes up to a minimum, but I do occasionally find your same desire to have some kind of separator show up. Someone in college showed me this command that you can also add to your .bashrc or .bash_profile:
With that, you can create a prominent and colorful bar to mark the start of output, and it makes it nice to see where the command started. Just run “bar;” followed by your command. the semi-colon separates commands. e.g.:
Posted 12:34 AM on Feb. 5, 2009 ↑
@Justin: I like the idea of using prominent vs. faded out colors to distinguish useful info versus spacefillers in the prompt itself. I may have to experiment with that for my own prompt.
@Carl: What can I say, I’m definitely a fan of the Mac (and most people who pay attention to me are, too). That’s a pretty cool tip, though, to only echo a divider on commands when you need it. It might be interesting to play around with aliasing the commands themselves that often need to be visually offset and prepending them with an “echo bar” statement.
I definitely was a bit torn over using a multi-line command; my ideal would have been a single-line prompt where the prompt color extended across the whole line (so text I input had the color, too) which would remove the necessity of the dividing bar. Unfortunately, that doesn’t appear to be possible, so I ended up with what I’ve got. Fortunately I don’t use the command line often enough for the signal-to-noise ratio to become annoying yet.
Posted 9:03 AM on Feb. 5, 2009 ↑
Forgive me for my unfriendly Mac statement. Re-reading, I realize I failed to get across my point which was:
This tip applies to other systems besides Macs. Yay!
Posted 10:11 AM on Feb. 5, 2009 ↑
@Ian, thanks for a nice tip.
Have you had a look at this page:
http://blog.infinitered.com/entries/show/6
That might be a good combination with your tip!
Wolf
Posted 1:39 PM on Feb. 18, 2009 ↑
I was not aware of the SIMBL addon to enable colors that are actually worth looking at; thanks for the tip!
Posted 6:21 PM on Feb. 18, 2009 ↑
This is a such a well put together guide, nice angle you have on a well covered theme, good to see some originality for once. Up there with the very best on the internet. Great job, keep up the good work.
Posted 7:38 AM on Mar. 21, 2009 ↑
Hey Mickey,
I’m glad you found it useful! I definitely was frustrated when I originally started searching and discovered that most of the info about customizing a bash prompt was difficult both to find and read, hence deciding to publish this article.
Posted 7:51 AM on Mar. 21, 2009 ↑
If you haven’t found a decent Git-client yet, have a look at http://gitx.frim.nl.
Posted 11:34 AM on Sep. 29, 2009 ↑
Hello, Beck could you please enlighten me and tell me which software you use in order to add the arrows in your images? like the image that says “heck yes”. I hope it’s not photoshop I’m looking for somethign simple to make that kind of annotations.
Posted 10:36 AM on Dec. 31, 2009 ↑
Hey there,
I used Skitch for the screenshots:
http://skitch.com/
It’s my favorite of the “easily take a screenshot and annotate it” type apps that have hit the scene recently.
Posted 10:59 AM on Dec. 31, 2009 ↑
Thanks a lot for the quick response man! great blog btw
Posted 11:02 AM on Dec. 31, 2009 ↑
I know you’ve probably changed this over the past year, but why not make it so the divider has a dynamic width? There is a variable called COLUMNS out there and you could just loop outputting a dash for every column.
Posted 11:14 AM on Aug. 13, 2011 ↑
@Kyle: that’s a great idea; I’ll have to look into it. Sucks when I have to resize my window and my divider is suddenly broken.
Posted 9:28 AM on Aug. 14, 2011 ↑
Great post. These work great when I enter the export commands into the current session. But when I save them to the .bash_profile file, the cursor displays at the beginning of the second line instead of after the => arrow. (Saving them to a .bashrc file has no effect, for some reason.) As soon as I press a key, the second (arrow) line is overwritten. Any idea what I’m doing wrong?
Posted 1:04 PM on Jul. 5, 2012 ↑
Very strange; I don’t know what would be causing that. Good luck figuring out how to get things working the way you want!
Posted 11:37 AM on Jul. 6, 2012 ↑
I don’t know, how I could lived without! :) I like!
Posted 5:51 AM on Dec. 26, 2012 ↑
Hi – thanks for writing this up – a good explanation and good feedback.
By the way, the .bashrc file is executed for every shell and the .bash_profile is executed only when you login.
So you typically put stuff in the .bash_profile that you only want to see once, and stuff in your .bashrc gets executed for each and every shell – typically only one per Terminal window.
Thanks again for explaining things…
Posted 6:13 PM on Jan. 7, 2013 ↑
If differentiating the prompt is really your concern, you are much better off using a simple color solution like on the IBM page:
export PS1=”\[\e[36;1m\]\u@\[\e[32;1m\]\H> \[\e[0m\]”
Posted 9:48 AM on Apr. 3, 2013 ↑
Thank you so much for the part about adding the backslash-escaped brackets to colour change.
I’ve been playing around with my prompt but changing the colour broke proper line wrapping – so I was desperately searching for a solution for this and yours is the only site that mentions this and how you fix it!
Posted 2:51 AM on May. 17, 2013 ↑