Archiving tweets using IFTTT and Dropbox

Update (Sept. 28, 2012): the method for archiving tweets using IFTTT and Dropbox describe here no longer works thanks to Twitter cutting off IFTTT’s access for anything except posting tweets to Twitter. I am looking into alternatives, but don’t know of any drop-in replacements currently.

Justin Blanton recently posted an approach to archiving tweets using plain text and Dropbox. In short, he’s using IFTTT.com (also known as If This Then That, a service that allows you to setup triggers and actions for events in common web services) to append every tweet to a plain text file in his Dropbox account.

In turn, Brett Terpstra took Justin’s IFTTT recipe and modified it to use Markdown formatting.

Now I have added my own spin to the idea by creating a script that I run via Hazel to automatically break the tweets into files by month. You could, of course, run the script using some other method; I just prefer the ease-of-use of Hazel.

Setting up

For this to work, you need three things:

  1. The IFTTT recipe
  2. The archiving script (also available inline below)
  3. A Hazel rule to pull everything together (or some other way to automatically invoke the script and pass it the filename for your initial archive file)

When you have those three things in place, shortly after you publish a tweet it will be appended to a plain text in Dropbox by IFTTT, then subsequently sorted into archival files by month by the archival script. The script also (optionally) expands Twitter’s shortened t.co links into the actual URL you posted.

For those who want a little more hand-holding, here’s specifically how to get all the various pieces lined up.

IFTTT configuration

You need to change a couple things in the IFTTT recipe to make it work for you. In particular, the default folder path (ifttt/twitter) is very uninspired. You also need to change the name of the file to your Twitter username. If you want, you can use a different file extension (like .md).

(Note that it’s entirely possible to archive multiple Twitter accounts using this method, but you will likely need multiple IFTTT accounts; so far as I know it is not possible to link multiple Twitter accounts to a single IFTTT account.)

Once you’ve got the recipe activated in your IFTTT account, post a tweet and make sure that it is showing up in your Dropbox (should happen within 15 minutes, or you can run the IFTTT recipe explicitly).

Archival script

Setting up the archival script will require a little bit of command-line work, but nothing too scary. To get started, you can download the script from GitHub, or create a file called archive-tweets.py in your favorite text editor and copy and paste:

#!/usr/bin/python
# -*- coding: utf-8 -*-

'''
This script parses a text file of tweets (generated by [IFTTT][1],
for instance) and sorts them into files by month. You can run it
manually from the command line:

    cd /path/to/containing/folder
    ./archive-tweets.py /path/to/@username.txt

Or run it automatically using [Hazel][2] or similar. The script
expects that you have a file named like your Twitter username with
tweets formatted and delimited like so:

    My tweet text
    
    [July 04, 2012 at 06:48AM](http://twitter.com/link/to/status)
    
    - - -

And that you want your tweets broken up by month in a subfolder next
to the original file. You can change the delimiting characters between
tweets and the name of the final archive file using the config variables
below.

By default, this script will also try to resolve t.co shortened links
into their original URLs. You can disable this by setting the 
`expand_tco_links` config variable below to `False`.

   [1]: http://ifttt.com/
   [2]: http://www.noodlesoft.com/hazel.php
'''

# CONFIG: adjust to your liking
separator_re = r'\s+- - -\s+'     # IFTTT adds extra spaces, so have to use a regex
final_separator = '\n\n- - -\n\n' # What you want in your final montly archives 
archive_directory = 'archive'     # The sub-directory you want your monthly archives in
expand_tco_links = True           # Whether you want t.co links expanded or not (slower!)
sanitize_usernames = False        # Whether you want username underscores backslash escaped

# Don't edit below here unless you know what you're doing!

import sys
import os.path
import re
import dateutil.parser
import urllib2

# Utility function for expanding t.co links
def expand_tco(match):
	url = match.group(0)
	# Only expand if we have a t.co link
	if expand_tco_links and (url.startswith('http://t.co/') or url.startswith('https://t.co/')):
		final_url = urllib2.urlopen(url, None, 15).geturl()
	else:
		final_url = url
	# Make link self-linking for Markdown
	return '<' + final_url.strip() + '>'

# Utility function for sanitizing underscores in usernames
def sanitize_characters(match):
	if sanitize_usernames:
		return match.group(0).replace('_', r'\_')
	else:
		return match.group(0)

# Grab our paths
filepath = sys.argv[1]
username, ext = os.path.splitext(os.path.basename(filepath))
root_dir = os.path.dirname(filepath)
archive_dir = os.path.join(root_dir, archive_directory)

# Read our tweets from the file
file = open(filepath, 'r+')
tweets = file.read()
tweets = re.split(separator_re, tweets)
# Clear out the file
file.truncate(0)
file.close()

# Parse through our tweets and find their dates
tweet_re = re.compile(r'^(.*?)(\[([^\]]+)\]\([^(]+\))$', re.S)
# Link regex derivative of John Gruber's: http://daringfireball.net/2010/07/improved_regex_for_matching_urls
link_re = re.compile(r'\b(https?://(?:[^\s()<>]+|\(([^\s()<>]+|(\([^\s()<>]+\)))*\))+(?:\(([^\s()<>]+|(\([^\s()<>]+\)))*\)|[^\s`!()\[\]{};:\'".,<>?«»“”‘’]))', re.I)
dated_tweets = {}
for tweet in tweets:
	if len(tweet) > 0:
		# Parse our tweet
		matched_tweet = tweet_re.match(tweet)
		# Replace t.co links with expanded versions
		sanitized_body = re.sub(r'@[a-z0-9]*_[a-z0-9_]+', sanitize_characters, matched_tweet.group(1))
		formatted_tweet = link_re.sub(expand_tco, sanitized_body) + matched_tweet.group(2)
		# Grab our date, and toss the tweet into our dated dictionary
		date = dateutil.parser.parse(matched_tweet.group(3)).strftime('%Y-%m')
		if date not in dated_tweets:
			dated_tweets[date] = []
		dated_tweets[date].append(formatted_tweet)

# Now we have our dated tweets; loop through them and write to disk
for date, tweets in dated_tweets.items():
	month_path = os.path.join(archive_dir, username + '-' + date + ext)
	# Construct our string with a trailing separator, just in case of future tweets
	tweet_string = final_separator.join(tweets) + final_separator
	# Append our tweets to the archive file
	file = open(month_path, 'a')
	file.write(tweet_string)
	file.close()

# All done!

I like to save the archive-tweets.py file in my Dropbox right next to my @ianbeck.txt archival file (makes things easy to keep track of). If you have changed the formatting of the

Next, you need to ensure that the script can be executed. To do so, open /Applications/Utilities/Terminal.app. This example code assumes that you are using the default settings for the IFTTT recipe and have saved the script in the same Dropbox folder, so adjust the path as needed and then run this command in Terminal:

chmod +x ~/Dropbox/ifttt/twitter/archive-tweets.py

You should also create the folder where your monthly archive files will live. By default it should be called archive, but you can use something else if you want.

Lastly, you might want to modify some settings in the script. There are two things you might need to adjust:

  1. If you have modified the delimiter between tweets in the IFTTT recipe, you need to specify what you are using in the script
  2. If you do not want t.co links to be expanded, you need to disable that in the script
  3. If you want your monthly archives in a folder named something other than archive, you need to specify your preferred folder name

You can find the configuration variables on line 34, or search for “# CONFIG“.

Hazel workflow

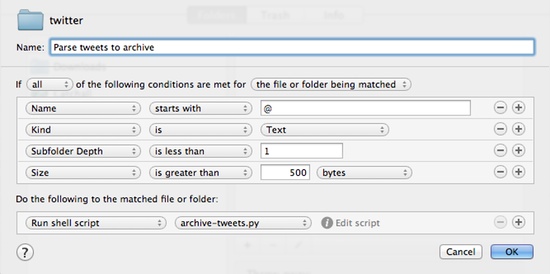
Now that the main moving pieces are in place you need to setup your Hazel workflow to automatically run the script every so often. Here’s what mine looks like:

Hazel setup

The important bits are having the name start with the “@” symbol, making sure that the subfolder depth is less than 1, and sticking a minimum file size in there (to make sure the script doesn’t get endlessly executed when the file is empty).

Why am I doing this, anyway?

To be honest, most people will probably not care about the fact that Twitter only allows you to access your 3200 most recent tweets. For most of us, tweets are ephemeral; you post it, your friends read it, and that’s that. If you have something you think is particularly clever or worth saving, you can mark it as a favorite and access it whenever you like.

For myself, though, I like having a record of the things that I write, even if it’s something stupid like, “Wow, my balaclava is particularly itchy today.” Why? Because every so often, I remember tweeting something that I need to reference (a link, a prior opinion, etc.), and searching Twitter always fails me. With the above archival setup in place, though, I can easily search for it using the tools built into my computer, and since the archive files are plain text they are as future-proof as I can get, extremely easy to work with, and won’t take up much space in my Dropbox.

Whether having access to your tweets down the road is important to you or not is something you’ll have to decide on your own. If it is, though, this is a pretty easy way to save them despite its geeky underpinnings.

Updates and corrections

July 5, 2012

Dr. Drang points out that @hugovk is the original creator of the IFTTT Twitter-to-Dropbox workflow, not Justin Blanton as I originally thought. Additionally, Dr. Drang offers a script for converting past ThinkUp databases of tweets into plain text format.

Brett Terpstra meanwhile has been hacking away with both my script above and Dr. Drang’s script, and currently has his modifications available on GitHub. I expect he will post his final workflow to his blog once he has them finalized. Good stuff.

July 6, 2012

I have updated the shell script (modified version is on GitHub or inline above) and added the following:

  1. All URLs are now converted to self-linking URLs for ease of parsing as Markdown: <http://wherever.com>
  2. Underscores in usernames are optionally escaped with a backslash in order to avoid italicizing: @some\_name (this is off by default, but you can enable it in the CONFIG section; I just have a friend named @_squark_ and was getting annoyed at his italicized name)

Note that neither of these changes is retroactive, so you will have to modify your existing archive file(s) if you want consistency.

Shuffling files around with Dropbox

One of my abiding problems is how to easily and quickly transfer files between my two computers. For the past several years, I have used an iMac as my work computer, and a MacBook Pro for my personal computer. (This might seem silly to some people since I work at home, and the two computers literally live about six feet away from one another most of the time, but I can’t overstate how much this helps my sanity.)

Recently, the problem with moving files around has been exacerbated because my iMac is stuck running 10.6, and I need 10.7 to test Slicy, so I finally decided to hack something together to make life simpler. (I’ve debated many a time upgrading the iMac to 10.7, but given how bad a performance hit my newer and better-equipped-in-the-RAM-department laptop took when upgrading, there’s no way I would be able to squeeze acceptable performance from the aging iMac.)

After looking at various options, I ended up creating a little workflow using Dropbox and Hazel, because both are tools that I already use. My goal was to create a way to move files to a different computer with a single action without needing the other computer to be awake or on the same network, and without using up my Dropbox storage quota on storing temporary files.

A disclaimer: the following workflow requires two to three bits of software, all of which will cost you if you aren’t already using them: 1) Hazel ($25 at the time of this writing), 2) a Dropbox account with sufficient empty space to move arbitrarily-sized files around (free if you manage to get a ton of referrals, otherwise $100 a year), and 3) optionally FastScripts ($15 at the time of this writing) or some other way to quickly execute an AppleScript. Oh, and a Mac. You could do the same thing on Windows or Linux, but it wouldn’t be as magical without Hazel (unless you could find some Windows or Linux equivalent app).

Setting up

The first step was easy enough; in Dropbox I created one folder for my laptop and one for my iMac (“To Laptop” and “To Desktop”, respectively). Since I rarely access these folders directly, I hid them a ways down in the folder hierarchy in Dropbox to keep them out of the way.

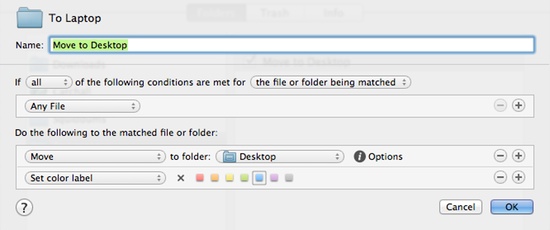
The second step was to setup a Hazel workflow on each computer targeting that computer’s folder. Here’s the laptop’s version:

Hazel workflow

Basically, any time it finds a file in the “To Laptop” folder on Dropbox, it immediately moves it to the Desktop and colors it blue so that I’ll notice it more easily. (You can, of course, move the file anywhere you liked; the Desktop is just convenient for how I work.)

Third, I wanted to be able to send files between computers with a keystroke, so I hacked together a quick Applescript that would take the selected file(s) in the Finder and duplicate them to my target Dropbox folder:

-- CONFIGURE: Set this path to your target folder
set targetDropboxFolder to POSIX file "/Users/MYACCOUNT/Dropbox/Sync/To Laptop/"

tell application "Finder"
	set targetSelectedFiles to selection
	repeat with activeSelectedFile in targetSelectedFiles
		duplicate activeSelectedFile to targetDropboxFolder with replacing
	end repeat
end tell

To use this script, create a new script in AppleScript Editor (/Applications/Utilities/AppleScript Editor.app), paste in the code above, adjust the path to your target Dropbox folder, and save it either in ~/Library/Scripts/ or one of its subfolders.

Personally, I use FastScripts to associate a keyboard shortcut with the script, but there are innumerable other ways to quickly access AppleScripts. Alternatively, you could just create an alias to your “To Other Computer” folder, stick it on the Desktop or somewhere else easy to get to, and then drag and drop things you wanted to move across (just make sure to hold down the option key when you do, or the file will be moved to the other computer rather than copied).

Wishing for an easier way

In a perfect world, I would write an app to take care of this stuff for me instead of relying on a bunch of third-party apps and services, but I don’t really have time to devote to the concept. Ideally, I would prefer not to need to always route through the cloud; if I am transferring a file, and the target device is on the same local network, the file should just be moved across using the local network. For lack of a more elegant solution, though, this workflow functions well, was quick to setup, and has been making me happy. Hopefully it will help a few other folks, too, or at least sparks some ideas for easier transferring of files between computers.

Buying Adobe Photoshop CS6 (or not)

Evidently a guy named Pat Dryburgh had some trouble buying Photoshop. His trial ran out, and when he purchased their Creative Cloud option to continue working, he discovered that his license number wouldn’t arrive for 24-48 hours.

All I have to say is, 24 to 48 hours? That’s nothing.

I preordered Photoshop CS6 the day it came out. Like Dryburgh, I’ve been using CS4 for quite some time; I originally purchased the CS3 web development suite while still in college, faithfully upgraded it to CS4, and decided I’d put up with enough of Adobe’s bullshit when I discovered that you cannot downgrade from a suite to a single product (of course, they don’t advertise this fact, so I discovered it by purchasing Photoshop CS5).

A little over a year later, and I’d forgotten my solemn vow because Photoshop CS6 looked like such a big improvement over CS4. So when CS6 preorders opened, I preordered it that day. Of course, preordering it took about 20 minutes, because Adobe is apparently incapable of supporting Safari, which I only discovered through trial and error. Probably because they rely on their own technologies to build out their web services.

In any case, I finally got my preorder in. I ordered a full boxed copy of Photoshop (I absolutely don’t trust Adobe to keep a downloadable copy available if I need to skip upgrades, so I’ve always bought boxed copies), since I have no use for the vast majority of the rest of the web suite and the difference in cost was only a hundred bucks or so. The Adobe store said they’d be filling the order in 7-10 days, which I figured would be 7-10 days after Photoshop was released on May 7th.

On May 14, my preorder had still failed to ship. I knew preorders were going out, because several of the people I followed on Twitter had received their copies. I tweeted my frustration:

@ianbeck: I wonder if Adobe will ever actually ship my Photoshop CS6 pre-order.

The next day, I received a reply from Jeffrey Tranberry, who is apparently “Chief Customer Advocate” at Adobe:

@jtranber: @ianbeck @thinkofdave Send me an order # so I can check on it. You can use the trial version to start using immediately.

I received the tweet about 20 minutes later, replied with my order number, and within minutes was told that Tranberry was “checking” what was wrong. I was pleasantly surprised; I’m generally not a fan of companies lurking about on Twitter trying to address customer complaints they find in searches. It’s one thing if I mention a company account; by all means, reach out to me then. It’s a bit weird when they jump into a conversation I haven’t invited them to, though. It’d be like if I were sitting at a deli, complaining about Obama with my friends and one of Obama’s PR people called me. “Hey, we were monitoring your conversation as part of our ongoing fight to maintain national security, and wanted to address some of your criticisms of the current administration.” Don’t do that. It’s creepy and invasive.

But I digress. In this particular instance, it appeared that Adobe was finally going to do right by me.

I’d forgotten that “Adobe Customer Care” is a contradiction in terms.

By May 18th, eleven days after CS6 was released, I figured enough was enough and contacted Adobe’s chat support to try and figure out what the heck was going wrong. Tranberry had clearly taken no action, and I felt justified complaining more directly now that were were clearly outside of their estimated shipping window.

It was, of course, a complete waste of time. Although the chat personnel did manage to extract my email address from me, presumably so that they could sell it to spammers. They certainly didn’t use it to contact me or provide me a way into any sort of ticket system.

The most information I could get out of the chat personnel was that there was a “preorder lock” on my order (whatever that means), and they said they had escalated it and the problem would be resolved without requiring further action from me within 2-3 days. I had to ask for the timeframe three times before they’d say that much, though, which made me a bit suspicious.

But whatever. I frankly don’t use Photoshop anywhere near as regularly as I used to (and mostly then for personal websites), so I figured I could wait.

I waited until May 25th, giving Adobe a full week to do anything at all. At that point, I decided enough was enough, and it was time to sit on hold for a while in order to talk to an actual person.

Ha. I would be so lucky.

When it comes to orders, Adobe offers three contact options: 1) phone support, 2) the online chat that I had discovered for myself was more of a waste of time than sitting on hold, and 3) a link to their knowledge base which is, in point of fact, not a method of contact. I called the 800 number.

After navigating through their phone tree, I was delighted to discover I did not need to sit on hold for a long period of time. Instead, very soon after being transferred, I heard a click like someone had picked up, a very faint voice saying who-knows-what, and then a sudden and repetitive beeping.

beep beep beepbeep beep beep beep

It just kept going and going. It sounded like I’d tuned onto a national news station on TV when they were testing their emergency broadcast system. I was still connected (the conversation timer on my iPhone continued to plunk away), but clearly was going to get nothing resolved talking to an electronics system suffering a panic attack.

I hung up and tried again. This time, I again got to a person very quickly after navigating the phone tree. He asked my name and order number, and in the middle of reading the order number to him there was a beep and I lost the connection. Checked my phone, connection to Verizon was fine. Tried a third time, and it once again cut me off as the person on the other end picked up (but this time without the repeating beeps).

At this point I’ve been building up a bit of Twitter rage:

@ianbeck: Tried to call Adobe Support about my *still* MIA preorder of Photoshop CS6, and got nothing but constant beeping. Might just cancel order.

@ianbeck: Oh lovely. “If you placed a preorder and the product has not shipped, you can cancel by calling Adobe Customer Service.” ‘Cuz that works.

@ianbeck: @Adobe_Care Is your call center is experiencing technical difficulties? I can’t get a call to stay connected.

@ianbeck: And there’s the third consecutive time I’ve gone through Adobe’s phone tree only to have their end drop the call. Total waste of my time.

@ianbeck: Seriously considering calling my bank to see if they can block the transaction if Adobe ever tries to charge me, and call it good.

Well, what a surprise. My old friend Jeffrey Tranberry pipes up:

@jtranber: @ianbeck @Adobe_Care sorry you’re having trouble. Do you have a case or order # I can help with?

Oh, Jeffrey. I certainly do. I sent it to you a week ago.

@ianbeck: @jtranber My order number is AD005051095. But I told you that last week, to no effect. Hope this time is the charm.

Adobe cares about exactly one thing, and it isn’t me. It is my credit card number. I forgot this fact because CS6 looked like it provided a lot of shiny new features that would be legitimately useful to me, but thanks to their customer-hostile policies and general incompetency I have thankfully remembered it prior to being charged.

I’m reaffirming my pact with myself not to buy software from Adobe, and now that one of their “customer care” people have finally contacted me via email I’ve asked them to cancel my preorder. I don’t feel cared for. Hell, Adobe wasn’t even capable of facilitating my original purchase.

Good-bye (again) Adobe. I hope when CS7 rolls around that I remember to read my own blog before I waste more of my time and energy on you.

A shout-out to the people on the ground

Okay, whew! Rant done. I’d like to take a moment, now that I’ve finished raging, to point out that I am not angry at people like Jeffrey Tranberry and the other customer support people I’ve interacted with at Adobe.

Or perhaps I should rephrase: they are the focus of my anger, because they’re the sole human points of contact I’ve been able to gain. But I’m not angry at them personally. I’m angry at an institutional system that cares so little for its customers that it provides its support personnel with inadequate tools (and likely very limited personal reach when it comes to addressing the varied needs of the people contacting them). One that as a matter of course releases only one to two minor bugfixes in their year-plus product cycles and planned not to patch known security vulnerabilities in CS5.5 after releasing CS6 until internet rage forced their hand.

Adobe needs to rethink its policies and put some effort into improving their purchase and support infrastructure, but I’m pessimistic. Sadly, despite their user-hostile policies they appear to still be making a fair amount of cash simply because when it comes to high-end graphic design software they’re the only game in town.

I can only hope that people like Pat Dryburgh and myself exiting that zero-sum game will start to put a crimp in the one thing they do care about: their bottom line.

Update

Just a quick update about how this little fiasco ended: after emailing Adobe to ask for them to cancel my order outright, I got a receipt thanking me for my order. Sure enough, I’d been credited and the product had finally shipped. Fortunately, the customer support person I had finally been able to get in contact with was able to get me a quick refund once the product arrived (since they needed the serial number to process it), and they ended up sending me a complimentary copy of Photoshop to try and make up for the pain.

Frankly, I’m not sure if it does, but at least I get to use some of the fun stuff in CS6 now without having to financially support Adobe. I sincerely hope that they take a better look at their customer support system, because although I’m grateful for the gratis copy of Photoshop, I’m still unsure if I’ll ever upgrade it again after the stupidity I had to wade through in order to get into contact with someone who could actually help me.

Affiliate Me Not

A while back, I experimented with using Amazon affiliate links on Beckism.com whenever I wrote up a short review of a product. I figured as long as I was linking to products anyway, I may as well get a kickback if people bought them through Amazon.

However, over time I realized when I visited other sites that did similar things that I really hated it, and I stopped publishing Amazon affiliate links. Clearly marked affiliate links are one thing; I have no problem with sites that review a product in depth and at the end say something like, “Hey, if you buy this product through this link I’ll get a little kickback.” It’s a great way to thank blog authors for taking the time to write an article that introduced you to a product you expect to love.

But all too many sites will route you to Amazon affiliate links without any sort of warning, and that just feels incredibly skeezy to me. For me, discovering that I’ve clicked an Amazon affiliate link without prior warning throws into question the veracity of the site where I found it. Is this product actually something I will enjoy, or were they just looking to make a quick buck?

The problem is particularly acute on Twitter and elsewhere where shortened URLs have thrived. Often, it isn’t possible to discover if a link is an Amazon affiliate link until you’ve clicked through it.

Personally, I like having control over whether or not I am going to give someone a kickback through an Amazon affiliate link, so to that end I created Affiliate Me Not: a new Safari extension that does just that (note: requires Safari 5.1).

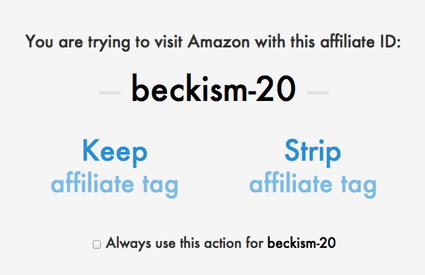
If you install Affiliate Me Not, when you try to visit an Amazon page with an affiliate tag in the URL, you will see something like this before the page even tries to load:

Affiliate Me Not screenshot

This way, you get to decide if you want to use the affiliate link or not, and if you check the “do this by default” checkbox you won’t have to see the interim screen the next time you click on a link with that particular affiliate tag. You can additionally control which tags are whitelisted or blacklisted in the Safari Preferences (using a comma-delimited strings of tags).

You can download Affiliate Me Not, or view the source code if that’s your sort of thing. Enjoy!

VoodooPad 5 released

VoodooPad 5 is out, and it’s awesome. Here’s some of what makes me excited about it:

  • All-new file format allows synching via Dropbox or version control (like git)
  • Markdown pages (with syntax coloring, and smart Markdown authoring features like automatically extending lists)
  • New event scripts make automating document tasks a lot more consistent

Also, VoodooPad just generally rocks. Go buy it; it’s on sale for a limited time.

There’s a ton of other new stuff, but I’ll leave it to you to read about it if you so desire.

Instead of gushing on about the new version, I wanted to share a project of mine that provides a starting point for using the new VoodooPad 5 hotness to create a static website. I call it, creatively enough, my VPWebsiteTemplate:

https://github.com/onecrayon/VPWebsiteTemplate

VoodooPad 5 already offers a lot of great features for exporting a website version of your document. What the VPWebsiteTemplate does is provide some scripts that offer additional functionality:

  • Automatic renames pages when you create them to be URL-friendly
  • Automatically generates page breadcrumbs using tags
  • Copies image and Javascript assets into folders (instead of having everything cluttering up your root website directory)
  • Adds support for Markdown-Extra style header IDs for easier same-page navigation
  • Automatically strips out nested links if VoodooPad and Markdown interfere with one another

And a number of features that stem from its origins as a static app documentation site generator:

  • Converts -> and => into &rarr; entities
  • Converts shortcuts using the format `command H` to use <kbd> elements (for easier styling as shortcuts)
  • Fixes paragraphs wrapping <aside> elements (since Markdown doesn’t handle HTML5 elements well)

VoodooPad isn’t appropriate for everything, but if you need to manage a static site with a single shared template (or a single template with minor variations), it’s hard to beat. The Markdown handling, dead-easy synching, and fact that you can package up absolutely everything about your site into a single file that is shareable with other VoodooPad users make it a really compelling solution for anyone who has had to fight with command-line static site generators before.

Documentation for using the VPWebsiteTemplate is available inside of the file itself, so go download it from GitHub already if you’re wondering how everything works. Happy Voodoopadding!

Organizing and packaging an Enyo 2 app

I enjoy using the Enyo framework to write apps (mainly because I am familiar with it from webOS development; it’s not perfect for everything by any means, but it’s one of the fastest methods for me to move from a mockup to a working app), and lately that has meant experimenting around with the pre-release (but public) version of Enyo 2.0. Unfortunately, Enyo 2’s documentation is pretty hit and miss at the moment. If you have used Enyo in the past most aspects of Enyo 2 should be very familiar, but for some tasks you simply need to dig into the source code and figure out how things work by hand.

One of those tasks is building Enyo for use in a production environment, and since I’ve been fighting with this over the course of my development of TapWatch, I figured I would share how I am doing things.

Project organization

To start, here’s how I typically organize things in my project’s root folder (this is certainly not proscriptive, but you need to know it to understand the logic behind the scripts that follow):

- build/
- css/
- images/
- source/
  - enyo/
  - lib/
    - onyx/
  - kinds/
  - package.js
- tools/
  - build.sh
  - package.js
- dev.html
- index.html

Working top to bottom, build is where my final production builds will end up, while css and images are where I store my common stylesheets and image files. Keeping these both in the root of the project makes things easier when it comes to previewing the app during development.

The source folder is where I store all of my Javascript files. Enyo 2 will automatically load package.js when you link against its parent folder, so the root package.js file is my access-point for all of my app-specific functionality. I typically store my custom app kinds in the kinds folder, although depending on the complexity of the app I might break them up differently (for instance, organize based on views, models, and so forth). Where you store your app code doesn’t matter a jot, to be honest. You can go as simple or complicated as you want.

I use git to manage my project, and the enyo and onyx folders are git submodules pointing to their respective GitHub repositories. I like using submodules because it makes it ridiculously easy to test out bleeding edge additions, while still being able to fall back to a particular commit or tag that I know is stable if I need to prep a build for distribution. Using submodules also allows me to experiment with different versions of Enyo and Onyx for different apps. If I were storing it in a central location, I could inadvertently break things in one app by updating Enyo for use with another. GitBox, my favorite Mac git client, provides great support for submodules; after you add them, you can manage the submodule just like another repository, and it’s one click to revert to your last saved commit if you are experimenting with bleeding edge commits.

The relationship between the enyo folder and the lib folder containing Onyx and any other official or third-party packages is something you will want to maintain. By placing your packages in lib next to the enyo root folder you can very easily access your packages without worrying about their specific placement using the special strings $lib and $enyo in your package.js files.

The tools folder is where I store my build.sh script that is responsible for putting together my production builds along with other utilities; more on that in a bit. The package.js file inside of tools simply links against the Enyo source and my app’s main package; this is used by Enyo when building itself for production use.

Lastly, dev.html is my entry point to quickly preview my app in a browser, while index.html is the actual HTML file that I will use in my production builds. These two are different because the development version needs to link against my various CSS resources, Enyo, and my app source separately, while the production version links against a much smaller number of compressed files.

Of course, I include a number of other things in my project root folder that aren’t shown here both to cut down on the complexity and because they are not applicable to all projects. For instance, I typically store platform-specific code and resources in top-level folders (iOS, webOS, etc.).

HTML files

Before you need to worry about building your production scripts, you will want to setup your HTML to allow you to process your app. As you can see above, I keep at least two copies around: a dev.html file for quick browser testing, and index.html for the actual production code.

My TapWatch dev.html files looks like this:

<!DOCTYPE HTML>
<html lang="en-US">
<head>
    <meta charset="UTF-8">
    <title>TapWatch Dev</title>

    <!--Include Enyo (debugging); automatically includes Enyo styles-->
    <script src="source/enyo/enyo.js" type="text/javascript"></script>

    <!--Include styles-->
    <link rel="stylesheet" href="css/styles.css" type="text/css">

    <!--Include application-->
    <script src="source/package.js" type="text/javascript"></script>

    <!--Configure for viewing on mobile devices-->
    <meta name="viewport" content="initial-scale=1.0, maximum-scale=1.0, user-scalable=no">

    <!--LiveReload, for live refreshing-->
    <script>document.write('<script src="http://' + (location.host || 'localhost').split(':')[0] + ':35729/livereload.js?snipver=1"></' + 'script>')</script>
</head>
<body>
    <script type="text/javascript">
        new TapWatch.app().write();
    </script>
</body>
</html>

Most of this is stuff you can just copy and paste straight into your own app (aside from the point where I initialize TapWatch, of course).

One item of interest is the LiveReload integration. LiveReload is an awesome tool for Macs (although I believe there’s a Window pre-release version, too) that can watch your web folder and do things like automatically compile LESS files every time you save and then ping the preview that the styles have changed. I use this in conjunction with the Espresso preview to have a preview of my app in my editor that updates while I work. This is an insanely helpful bit of wizardry; being able to see my changes in live time really speeds up my workflow.

As for the production-ready index.html, it’s a bit simpler:

<!DOCTYPE HTML>
<html lang="en-US">
<head>
    <meta charset="UTF-8">
    <title>TapWatch</title>

    <!--Include our styles-->
    <link rel="stylesheet" href="css/styles.css" type="text/css">

    <!--Include our application sourcecode-->
    <script src="sources.js" type="text/javascript"></script>

    <!--Configure for viewing on mobile devices-->
    <meta name="viewport" content="initial-scale=1.0, maximum-scale=1.0, user-scalable=no">
</head>
<body>
    <script type="text/javascript">
        new TapWatch.app().write();
    </script>
</body>
</html>

The links to sources.js and so forth rely on my specific build layout; trying to preview this file from anywhere but a final build folder does nothing.

The tools folder and build.sh

In order to build your production app you are going to need to get your hands dirty with a little shell scripting. Never fear, though! The process is fairly simple, and the necessary shell commands innocuous.

You will probably want to do some or all of the following:

  • Compile Enyo, any third-party packages you depend on, and your app’s code into a single file (this is a very easy one-step process, but it will require that you install node.js first)
  • Concatenate and minify your built app with third-party scripts (like cordova.js if you are building a PhoneGap app)
  • Concatenate and minify your CSS, if you have more than one CSS file
  • Copy the files you need for a production build (and only those files) into your build directory for distribution
  • Perform any platform-specific logic

In order to accomplish these tasks, my personal build.sh script does the following:

  1. Creates a tools/compiled/ folder in which it will collect in-process files (I exclude the compiled folder from git in my .gitignore file)
  2. Creates a build/www/ folder in which it will output the final production build
  3. Uses Enyo’s built-in minifier to package the app’s core files
  4. Further concatenates and minifies CSS and Javascript using YUICompressor (this step is entirely optional, or you could always use a different minifier); I have yuicompressor-2.4.7.jar installed in the tools folder so I don’t have to worry about where it is in the path
  5. Copies images, css, compiled scripts, and the index.html file into the build/www/ folder

And here is the code:

#!/bin/bash

# Setup path to node (to make sure it's in the path)
export PATH="/path/to/node/bin:$PATH"
export NODE_PATH="/path/to/node:/path/to/node/lib/node_modules"

# Make sure the base directory is the tools directory
# This makes sure relative paths always work right
ORIGINAL_PWD="$pwd"
cd "$( dirname "${BASH_SOURCE[0]}" )"

# Ensure basic paths exist
# If we don't do this, later actions might fail
mkdir -p compiled/enyo-min
mkdir -p compiled/css
mkdir -p ../build/www/images
mkdir -p ../build/www/css

# Build the app and Enyo
../source/enyo/tools/minify.sh -no-alias -output compiled/enyo-min/app package.js

# YUI compress our Javascript
cat compiled/enyo-min/app.js | java -jar yuicompressor.2.4.7.jar -o compiled/sources.js --type js

# YUI compress our CSS, as well
cat compiled/enyo-min/app.css ../css/styles.css | java -jar yuicompressor-2.4.7.jar -o compiled/css/styles.css

# WWW build
# Copy our latest images, CSS, and HTML to the www directory
rsync -av ../images/ ../build/www/images/
cp compiled/css/styles.css ../build/www/css/styles.css
cp ../index.html ../build/www/index.html
cp compiled/sources.js ../build/www/sources.js

# Resume our working directory
cd "$ORIGINAL_PWD"

Of course, this is pretty specific to my own project; you would likely be using completely different paths for some of the items, and you might not want the extra minification and so forth.

The most important bit is the line that builds Enyo and the app:

../source/enyo/tools/minify.sh -no-alias -output compiled/enyo-min/app package.js

As best I can tell, the -no-alias argument has to do with how Enyo dependency loading is handled. I have not had a chance to test what aliases do, though. The -output argument specifies the file name (with optional folders prepending it). So in this case, the final files will be called app.js and app.css, and will be stored in the compiled/enyo-min/ folder. There are a couple of other arguments, but when loading the minify script from directly within your Enyo installation, they don’t appear to be necessary. You can always use the -h argument for a full listing.

In order for the Enyo minify.sh script to work, you will want to include this in your tools/package.js file to tell it to combine Enyo with your app:

enyo.depends(
    '$enyo/source/minify/',
    '../source/'
);

There are some other fun things you can do in the build script, as well. For instance, if you are building an iOS app using PhoneGap or similar, you can use the following conditional statements to process differently when you are running the script from an Xcode build step vs. directly:

if [ -z "$IPHONEOS_DEPLOYMENT_TARGET" ]; then
    # SCRIPT EXECUTED DIRECTLY
fi
if [ -n "$IPHONEOS_DEPLOYMENT_TARGET" ]; then
    # EXECUTED FROM XCODE IOS BUILD STEP
fi

And of course you can add platform-specific build steps using the same basic tools (rsync -av to copy all files in a folder, cp to copy a single file, and mkdir -p to make sure an entire directory path exists are all very handy).

Once you have your build script setup, you can create a custom build by executing the build script in the Terminal, or by adding it to your build steps in Xcode or similar if you are building for a specific platform.

Go forth and build

Hopefully my particular setup has provided you with some ideas or a starting point for organizing and building your own app’s source for production distribution. Enjoy!

Learning to code

Two of my younger extended family members have contacted me recently wondering how to get into app development, which is admittedly kind of a puzzler for me (apparently publishing TapWatch gained me some level of legitimacy, even though TapNote continues to vastly outperform it, dead platform and all). I could recommend a book, I suppose, except that the only coding book I have ever used is Dynamic HTML: The Definitive Reference. Dynamic HTML is fantastic if you need to reference absolutely anything to do with HTML, CSS, or Javascript, but a lot less useful for someone who wants to write, say, Objective-C and has only the foggiest of ideas about what they’re getting into.

Frankly, the way I learn a new language or tool is by using it. I start with a project, usually something I want to use myself, and then just jump in feet first. This typically involves scouring the internet for example code, tutorials, and prior art that I can implement and tweak to my own needs while regularly banging my head against the wall. I’ve bought a few coding books aside from Dynamic HTML over the years, but I never make it very far past the introduction. They bore me to tears. Head-to-wall contact is admittedly a bit painful, but it’s a lot more interesting and the things that I learn tend to stick.

So recommending books is out. I’ve heard good things about a few of them, but having never read any (or learned anything substantive the few times I did try to crack their covers), I’m rather unqualified.

But saying, “Just find a project and run with it!” isn’t terribly helpful, either. That’s a great way to encourage a proto-coder to drop the whole idea before they really get started. Especially if their ultimate goal is writing an app for their favorite iOS device, which can be a complicated and frustrating process even for veteran coders.

And at this point I find myself staring at a blank email, certain I am about to send my young relative down the path to a sad and codeless life.

Though I may not have a lot of practical knowledge when it comes to easing your way into coding, I do have a fair bit of observations based on first-hand experience to offer. Perhaps that will be helpful instead.

Overcoming the wall

The land of coding is a wonderful, magical, frustrating place but to get there you have to find your way over the wall that surrounds it. This isn’t a learning curve (although you’ll find plenty of those beyond); it is a wall. Steep, high, and not exactly obvious in approach. The simple fact is that coding is unlike anything you have ever done previously. When you write code, what you are actually doing is using a specialized language to lay out simple, logical instructions for a device that can only make the mistakes you inadvertently tell it to make (the trick is that huge numbers of other people have already layered on numerous strata of instructions with their own inadvertent mistakes that you are building on top of, so even if your code is perfect you still may find yourself running into problems that encourage head-meet-wall interaction).

There are analogs to other things you might have learned in the past (other countries’ languages, scientific experiments, math, art), but particularly if you do not know what you are getting into, jumping into coding will likely feel like running into a wall. You can vaguely see where you want to be when you back up far enough, but when you get close the whole thing is simply overwhelming.

But do not fear! Many of the other people who have scaled this wall in the past are there to help you over, through, or under it.

Your first coding lesson

I shall now give you your first coding lesson. Learn this, and you’ve basically lopped off the top few feet of the wall before you ever reached it.

Here it is: dream big, act small.

There are numerous desires that lead people to coding, but probably the two most common I run across are the desire to make money and the desire to make a tool you yourself want to use. And make it right this time, because darn it those other developers are approaching the problem all wrong.

Both are great motivations, but keep in mind that neither is something you are likely to accomplish immediately. Especially when it comes to app development a lot of people nowadays are going into it with stars in their eyes, imagining their app taking off on the bestselling charts and making hundreds of thousands of dollars in a month or two. Banish this fantasy! Yes, it is remotely possible you could succeed wildly with your first app/website/whatever, but the chances of it are vanishingly slim. Striving for widespread adoption is laudable, but if you measure your success solely against it you will quickly become discouraged, and discouraged people don’t ship software.

So have your big dream, but act on smaller things. Coding is about taking a complex problem and breaking it down into manageable smaller steps. It is about understanding the limitations and restraints you are working with and finding ways around them or adapting your code and vision to work within them. It is about having a laundry list of features that you know you absolutely must implement, but being able and willing to ship only the tiniest subset of them in your initial 1.0 release, and then steadily adding more as you go.

It is about realizing that you are not, in fact, facing a wall. You are facing a collection of stones, each of which is much easier to deal with on its own.

Three things to master

At root, there are only three things you have to learn:

1) The basic building blocks: variables (typically composed of arrays, strings, numeric types, dictionaries), functions, loops, conditional statements, and (for most modern languages) classes and objects. Learning about this stuff pretty much allows you to write in any coding language you want; usually the only thing that differs between languages is the specific syntax you use, which is (typically) easy to pick up. Coding is simply a specific, logical way of thinking and communicating using a small number of standard tools.

For basic building blocks, you can find any number of “getting started with language X” tutorials and resources online. Look for the very early introductory materials that introduce variables, functions, etc. and read through them. Once you understand if/elseif/else blocks, for and while loops, variables, and functions you will have the basics for what you need to read and write code.

2) The syntax: every language is different, so before you can write one or another you have to figure out how it handles the basic building blocks from above. For instance, here’s the same variable (a string) in three different languages:

Javascript:

var helloString = 'Hello world!';

PHP:

$helloString = 'Hello world!';

Objective-C:

NSString *helloString = @"Hello world!";

Exact same meaning in all three, but slightly different requirements for each. When you are learning the building blocks above, try to find a tutorial for whatever language you are most interested in working in right away, because all the examples will use its syntax, allowing you to learn both at once.

3) Specific capabilities: every language and environment offers slightly different built-in functions and so forth that you can call upon. This is the stuff that I typically spend very little time learning, and look up as I work.

For instance, PHP has a zillion functions that help with anything from manipulating strings to connecting to databases, and it would be a complete waste of my brain to try and memorize them. Instead, I keep the PHP documentation handy when I am working in that language and reference it when I need to figure out how to do a particular task.

The same applies to Objective-C; a lot of the complication behind Objective-C is that most of what you will be doing is working with the framework’s provided objects, functions, and methods, and since there are so many of them it can be overwhelming when you get started. Instead, ignore them. It might be worth skimming over some of the functions provided for working with the basic types of variables like strings, arrays, and dictionaries so you have an idea of what things you can do out of the box, but typically it’s easier to look this stuff up as the need arises.

Practical application

Lovely abstract overviews and pithy sayings may make you feel good, but coding is a practical activity and up to now I admittedly haven’t offered much specific, practical advice. Let’s change that, shall we?

When you are first getting into coding, any language you learn is going to help. They all will teach you the basic building blocks (and for a lot of them, you’ll pick up a fair amount of common syntax, too), so it doesn’t matter at all where you start. The corollary of this is that learning a language other than the language you want to work in might be a good idea, particularly if it will allow you to see results more quickly (and based on my own experience, seeing results quickly is important; there is something truly magical about using something you have programmed that pays for the frustration and difficulty leading up to that point).

For instance, if I were just now getting into coding with the ultimate goal of publishing a native Objective-C app, I would not start off working in Xcode and trying to learn Objective-C.

I would learn Javascript.

The benefit of Javascript is that a lot of the syntax is very similar to C, but because it is a high-level language you can go from learning the building blocks to actually creating something a bit quicker (and typically with less frustration, although there are certainly pain points in Javascript, as well). Javascript has its share of unique quirks, but with your pick of frameworks like Enyo, jQuery Mobile, Sencha Touch, and others you have some very useful tools that can speed things up by providing common interface elements and other niceties.

Granted, you will likely want to learn a framework in addition to the language itself to use them, but the same is true of Objective-C (coding in Objective-C is practically nothing but learning to use a framework).

How I would learn Javascript is a little more up in the air, but I have heard excellent things about Codecademy, so I would likely start there, and then quickly transition into writing my own app as soon as I learned enough to be dangerous. Most Javascript frameworks also have active communities surrounding them, so I would try to leverage those to help me get over the difficulties of going from idea to actual working interface elements on screen.

Once I had a working, simple Javascript app, then I would start digging deeper into Objective-C as I moved toward my true goal.

Other resources

Not everyone learns the same way as I do. If you learn better through books, then by all means visit your local bookseller, consult some Amazon reviews or similar, and try one of them.

Regardless of what you are interested in coding, I would also highly recommend taking a course in C if the chance arises (or C++, but C is far more universally useful). A local community college would probably be the most likely place to find something like this. When I was in college, taking a course in beginning C++ was an incredible boon. It taught me a lot about not only C (which has been useful when I need to write Objective-C or try to read other source code written in other low-level languages), but also introduced me to the command line. Getting enough knowledge not to be scared of the command line is incredibly liberating.

General courses on how to think about and approach code would also likely be useful, but you can usually achieve the same knowledge through active curiosity and a willingness to read a bunch of articles and blog posts online.

Go forth and code

How you go about it and what language you use doesn’t matter. Ultimately, what matters is that you get out there and start writing code. Come up with your big dream, and for your first small act create something simple but useful, be it a website, a mobile app, or a script that makes a repetitive action on your computer less onerous. Learn Javascript, or buy a book about Objective-C, or find a course to take. Experiment, fail, and try again.

No matter what route you choose, it will be frustrating, it will be difficult in the beginning, but it will be worthwhile. Even if you never spend the time to get particularly fluent in any given language, understanding the basic building blocks of code and knowing just enough to be dangerous can open a lot of doors and give you a way to tweak the devices that you rely on every day to better suit your needs.

Good luck!