


MarsEdit is a brilliant product, and one that I’ve been trying to use for my blogging ever since version 2.0 was released by Red Sweater Software (aka Daniel Jalkut). Initially, though, I didn’t have much luck and kept finding myself returning to the WordPress web interface. However, version 2.1 finally added decent tagging, which provided the impetus to at last move all of my blogging activities into MarsEdit.
For Beckism.com this was easy, but for Tagamac I had a big problem: MarsEdit didn’t give me access to the many images that I’ve uploaded using the WordPress web interface. This is a major issue for Tagamac, because I reuse images a lot (when writing about software updates).
Although Daniel Jalkut has stated that he’s going to implement some form of image migration, I got impatient this weekend and hacked my way through the MarsEdit uploaded files plist. It took me about an hour and a half to get the 40 images I wanted in, but after I hammered out a few details the process was pretty straight-forward. For anyone else who is frustrated by the lack of their old images in MarsEdit, read on for some tips and advice on how to hack your own plist and lead a happier, more fulfilling life.
Before you get started, a few disclaimers: this process is completely unsupported by the developer, and if you don’t know what a “plist” is, you should probably stop right now or else proceed very slowly and cautiously. Mucking around in preference files is an excellent way to screw up your app.
With that out of the way, let’s get started.
First off, go invest in PlistEdit Pro (or at least download the demo). You’re going to be doing a lot of copying and pasting, and trust me: you don’t want to edit plists in plain text form. PlistEdit Pro also lets you duplicate and drag and drop XML nodes, which makes it about a trillion times more useful than the default Property List Editor included with Mac OS X.
Assuming you’ve got PlistEdit Pro, open MarsEdit, make sure that you’ve uploaded at least one image using its Media Manager to the target blog, and then quit the program. It’s possible to do everything from scratch, but this will make your life a lot easier.
Navigate to ~/Library/Application Support/MarsEdit/ (if you’re not familiar with that notation, “~” means your user account folder, which is the folder that contains the folders Documents, Desktop, Music, Pictures, etc.). Duplicate the file UploadedFiles.plist so that if you totally screw up you can get MarsEdit working again. Open UploadedFiles.plist in PlistEdit Pro.
Next, open the ~/Library/Application Support/MarsEdit/UploadedFiles/ folder and go through its sub-folders until you find the image you uploaded using MarsEdit to the target blog. This is where you’ll be copying all your old images into.
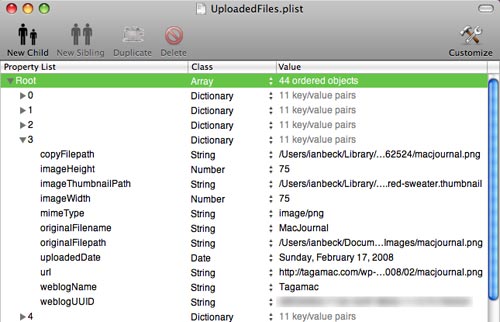
The UploadedFiles.plist file is organized into a root level which contains a bunch of numbered entries (starting at 0). If the image you uploaded to your blog was the most recent image you uploaded, it should be the highest numbered row. Find it and toggle the row open using the little arrow. You should see something like this:
This is where you realize just how much work you’re in for and give up. If you’re lucky (like me) and all of the images you need to migrate into MarsEdit are the same size and type of image, you’ll be editing four of those entries for each image, copying the image into the folder you found above, and creating a thumbnail version of it for MarsEdit to display. If your images differ in size or type, then you’ll be editing all but three of the fields for each image.
You have to want this.
If you’ve decided that yes, you do want it that bad and absolutely can’t wait for Daniel Jalkut to implement some sort of migration assistant, here’s the process:
Select the row you toggled open (“3” in the example above) and click the “Duplicate” button in the PlistEdit Pro toolbar. The duplicate will be inserted immediately below and everything will be automatically renumbered (so your duplicate entry would be “4” in the example above). To make your life easier, drag the duplicate to the very bottom of the list. This will reduce confusion when you begin duplicating over and over.
The general workflow that I followed and recommend:
- Duplicate the last row (which I just described) so that you get all the weblogName, weblogUUID, and so forth for free.
- Used your blog’s admin interface to get the URL of the image (I had an empty post open so I could insert the images as I went).
- Because the image name and month were about all that ever changed in this path, I’d just switch back to PlistEdit Pro and change those in the
urlentry by hand. If yours differ a lot, you may want to use copy and paste. - Edit the
copyFilepath,imageThumbnailPath, andoriginalFilepathfields with the image’s name and appropriate path. For the first one I used PathFinder‘s Copy Path→Unix command (available in the right-click contextual menu). All of my images were in the same directory, so after that I just edited the filename at the end. If yours are located in different places, you’ll need to edit the entire path for each image. - If your image is a different width/height from what’s shown in the
imageHeightandimageWidthfields, then you’ll need to edit these. Mine were all the same, making the whole process that much easier. - Set
originalFilenameto the text that you wanted to be used as the image’s alt text (MarsEdit by default uses the actual image name, e.g. “example.jpg”, but as long as you have the chance to set some intelligent alt text, I say why not? As far as I know, this field isn’t used for anything else). - If your image is a different type than the image you duplicated this row from, you’ll need to change the
mimeTypeentry accordingly (some common mime types: “image/png” for PNGs, “image/jpeg” for JPEGs, “image/gif” for GIFs). Odds are, the world will not end if a few mimeType entries are incorrect; I don’t know if it’s actually used by MarsEdit after the image has been uploaded. - In the Finder, copy your image into the appropriate folder (you located it inside the
~/Library/Application Support/MarsEdit/UploadedFiles/folder already). If you don’t have the image backed up on your local machine, download it from your server. - Duplicate the image for the thumbnail. If either height or width of the image exceed 128 pixels, you need to resize the thumbnail (in whatever editor you prefer; I recommend Acorn) so that both dimensions are 128 or less.
- Edit the name of the thumbnail version so that it’s the same as the image with “.com.red-sweater.thumbnail” appended to the end (e.g. “example.jpg.com.red-sweater.thumbnail”).
And that’s it! The image should be added to MarsEdit now, and accessible from the Media Manager catalog tab. After you add the first one, you should probably save the plist and open MarsEdit to make sure that it shows up the way you expect. If it does, then feel free to add as many other images as you need using the same basic process. As long as you take it slow and make sure that you get all the names right, you shouldn’t have any problems.
Some notes:
The type of image of the thumbnail doesn’t appear to matter. Theoretically, the name of it shouldn’t matter, either, as long as you have the correct name in the plist file. The naming convention described above is the way MarsEdit does it automatically, though, so it’s probably a good idea to stick with it.
The copyFilepath and originalFilepath entries may well be optional. In fact, you might well be able to get away with only copying a thumbnail version of the image into MarsEdit’s Application Support area since when it comes to viewing the image in the Media Manager and adding it to your blog posts, the only things that matter are the thumbnail and the URL. I didn’t experiment with this, but if you do let me know in the comments if it works or not!
Overall, this is a major pain (it took me a good hour and a half to two hours to migrate the 40 images that I need into MarsEdit), but if you use your images a lot like I do, it can really help you move into MarsEdit and out of the web interface once and for all. Particularly compared to WordPress’s terrible image manager, MarsEdit’s Media Manager is a breath of fresh air for me. Good luck!
No responses to “Migrating old images into MarsEdit 2”
Leave a response