Adventures with Yahoo Pipes

When I was testing Tumblr as a platform for beckbits, I discovered that their RSS feeds didn’t offer quite what I was hoping. Since I was primarily planning to use beckbits as a link blog, I wanted it to work Daring Fireball-style: link items should go straight to the source material, and all other items should be permalinks back to the site. I’ve always thought that was a brilliant design choice on John Gruber’s part, and I’ve always been a big believer in integrating aspects of great design that I find around the web into my own projects.

In the hopes that I could take the RSS feed and remix it easily on my own, I turned to Yahoo Pipes. Yahoo Pipes provides a relatively easy graphical interface to parse, modify, and combine data streams, JSON, and RSS and spit it back out as RSS, JSON, or PHP serialized code. I first discovered Pipes when I found someone’s “lifestream”, a website that displayed a list of their activity across numerous different services using Yahoo Pipes. These kind of RSS feed mashups seem to be the most common use of the service, but the service is quite flexible so it seemed well suited for repurposing Tumblr’s RSS feed to my own uses.

Over the course of creating the feed, I discovered some interesting features that I feel are worth sharing. For those of your who are curious about my specific implementation, here’s the actual pipe that is powering beckbits.

Moving data between elements

Very early on in my exploration of the default Tumblr RSS feed I realized that I was going to need to use the Tumblr API if I wanted to get direct access to the various components that make up Tumblr posts. Of course, the API provides completely different elements than an RSS feed, so one of the main tasks of my pipe is to move data around between elements.

For things with a one-to-one relationship, the “Rename” operator typically does the trick. For instance, using the external site’s URL for the RSS item link on Tumblr link items was as easy as throwing in a Rename with the rule “item.link-url renamed to link“.

But what about when I needed to combine multiple fields into one? Rename certainly wasn’t going to help me there, and I couldn’t find any way to pipe data between operators and string functions.

Fortunately, the Regex operator came to the rescue.

Although I couldn’t find any documentation for this, the regex module offers a couple great features:

  • If you reference an element in the first column that doesn’t exist, it will be created.
  • You can include the contents of other elements using the “named backreference” syntax (${element-name}). For instance, when I wanted my description element to include both the Tumblr “quote-text” and “quote-source” elements the “replacement” column looked something like this:

    <blockquote>${quote-text}</blockquote><p><cite>${quote-source}</cite></p>

Simple conditionals using regex

Thanks to the fact that everything in a Yahoo pipe is evaluated sequentially, you can use the regex operator to setup simple conditionals. For instance, regular Tumblr posts have an optional title. If the title existed, I wanted to use it as my RSS item’s title; otherwise it should default to a short excerpt of the text. To accomplish this, I setup the following rules:

Rename
item.regular-title copy as title

Regex
In item.title replace (.*) with $1```${excerpt}
In item.title replace ^```(.*)$ with $1
In item.title replace ^(.+?)```.* with $1

The basic idea is to combine two fields into one separated by some delimiter characters that are unlikely to ever show up otherwise. I chose to use three backticks, since it kept things pretty legible and I rarely use backticks. If you’re not comfortable with regex, the rules in order say:

  1. Copy regular-title to title (because regular-title might not exist, this may result in an empty title element)
  2. Append ``` plus the excerpt element to whatever is in the title element
  3. If the title element starts with backticks (^```), replace its contents with whatever follows the backticks (the excerpt)
  4. If the title element starts with one or more characters followed by backticks (^(.+?)```), replace everything with that starting content

Replacing your site feed with a pipe

Once I’d created my pipe it was time to replace beckbits’ feed with the pipe, and I discovered that Yahoo Pipes has a serious downside when it comes to using it instead of your default site feed: the pipe’s output always links back to the pipe page as the feed’s homepage. Although this wouldn’t be a huge deal, it has the unfortunate side effect of causing the favicon associated with your feed to be the Yahoo Pipes favicon, which is extremely non-ideal. In order to fix this, you actually have to post-process the pipe output.

For myself, I opted to do this by reading in the pipe as serialized PHP and then constructing my own simple RSS feed. If you’re interested in doing something similar and would like a starting point, here’s the gist of it.

Introducing beckbits

If you ask my supervisor, she’ll tell you that I’m the Director of Web Services. This is bullshit, but it sounds professional and presumably the clients love it. So that’s alright.

The truth is, I’m a problem-solver. Every day, I sit down at my computer and I solve people’s problems. Perhaps the problem is that Client A wants a site that they can update themselves. Or maybe my coworker needs me to figure out why the heck their code is breaking in some browsers but not others. And sometimes Client C just has to have a rainbow unicorn spring out of the middle of the page and dance on the user’s mouse cursor in a paroxysm of misused Javascript. The problems change day to day and project to project.

I’ve now been solving problems professionally for over a year and a half, and I’ve found that in the course of solving problems I often discover information and tools online that are extremely useful for web work. Up until now, I haven’t done much with these tidbits aside from occasionally bookmarking them.

No longer! I am pleased to announce beckbits, a collection of links, tips, and other tidbits that I discover during my day job and would like to share with other web problem-solvers. Aside from links to useful resources that I’ve discovered, I may occasionally post software or productivity tips, links to my most recently completed sites, and other minor items that relate to my work as a web professional.

Enjoy!

Encode named HTML entities with Python

Edit [June 29, 2021]: This post evidently has quite a high Google ranking for certain keywords, despite the code being ancient and written for a version of Python that is no longer supported. You can review my original post below, but here’s some Python 3 that will likely treat you better:

#!/usr/bin/env python3
from html.entities import codepoint2name

def encode_named_entities(text, convert_less_than=False, convert_greater_than=False):
    """Converts UTF-8 characters into HTML entities

    By default, all non-ASCII characters and ampersand will be converted to named
    entities, falling back on numeric entities.

    Less than and greater than characters can be optionally included with the
    keyword arguments.

    Returns the modified string.

    USAGE:
        text = "I love <b>jalapeños & fun</b> ☜!"
        entity_text = encode_named_entities(text)
        # "I love <b>jalape&ntilde;os &amp; fun</b> &#9756;!"
        entity_text = encode_named_entities(text, convert_less_than=True)
        # "I love &lt;b>jalape&ntilde;os &amp; fun&lt;/b> &#9756;!"
    """
    new_text_list = []
    for character in text:
        code_point = ord(character)
        # ASCII characters are 0-127
        if code_point < 128:
            # Process ampersands and carets, if requested
            if character == "&":
                new_text_list.append("&amp;")
            elif character == "<" and convert_less_than:
                new_text_list.append("&lt;")
            elif character == ">" and convert_greater_than:
                new_text_list.append("&gt;")
            else:
                new_text_list.append(character)
        else:
            # For all other characters, try to convert to named entity
            try:
                new_text_list.append(f"&{codepoint2name[code_point]};")
            except KeyError:
                # And fall back to a numeric entity
                new_text_list.append(f"&#{code_point};")
    return "".join(new_text_list)

Original post

If you’re using Python to parse text that’s going to end up on the web, odds are you need to worry about character entities for Unicode characters.

Obtaining numeric HTML/XML entities is easy enough; I found several different ways to do so in a quick Google search, this being the easiest (text is just an example variable):

text = text.encode('ascii', 'xmlcharrefreplace')

However, it is significantly more difficult to find a way to encode text as named character entities, which if you’re ever going to need to look at the markup later is vastly preferable. After a lot of digging, I discovered some basic logic for named HTML entities in the Python Cookbook. After improving on it to make sure that all entities get replaced (even high level ones without named equivalents) I’ve got something that others may find useful in turn. Simply place this code into a file called named_entities.py and stick it somewhere that your script can find it (or just stick the code at the top of your file, if you only need it in one place). Usage info is in the comment at the top of the code.

Please note that this code is for Python 2.x. Python 3 moved codepoint2name into html.entities.codepoint2name, so you’d need to modify the import.

'''
Registers a special handler for named HTML entities

Usage:
import named_entities
text = u'Some string with Unicode characters'
text = text.encode('ascii', 'named_entities')
'''

import codecs
from htmlentitydefs import codepoint2name

def named_entities(text):
    if isinstance(text, (UnicodeEncodeError, UnicodeTranslateError)):
        s = []
        for c in text.object[text.start:text.end]:
            if ord(c) in codepoint2name:
                s.append(u'&%s;' % codepoint2name[ord(c)])
            else:
                s.append(u'&#%s;' % ord(c))
        return ''.join(s), text.end
    else:
        raise TypeError("Can't handle %s" % text.__name__)
codecs.register_error('named_entities', named_entities)

One last thing: whether you use numeric or named entities, you’ll probably want to encode ampersands afterward. Here’s the regex that I’ve been using to do so, and it’s safe to run on the output of either the named or numeric entity creation code (remember to import re before trying this at home):

text = re.sub('&(?!([a-zA-Z0-9]+|#[0-9]+|#x[0-9a-fA-F]+);)', '&amp;', text)

Enjoy!

Espresso 1.0 released

Espresso 1.0 has officially been released for general consumption, and I’m extremely proud to announce that TEA for Espresso (coded by yours truly) is bundled with the application! Espresso is a text editor aimed firmly (for the moment) at the web editing crowd, and offers code folding, a powerful code navigator, FTP synching, Textmate-style text snippets (with tab stops and all that jazz), and an extensible underbelly for extending the program. It’s pretty sweet.

That said, I have to admit that my feelings about this release are mixed, and I don’t think that most people who live in their text editor (including myself) will be able to switch to Espresso full time just yet. I’m beginning to think that this may just be how text editors work. I was completely underwhelmed by Coda when it first came out, too, but after Coda 1.5 I tried it again and started migrating projects to it, and as of 1.6 I’m using Coda full time. While some people will find Espresso 1.0’s friendly and simple editing just what the doctor ordered, I suspect that its wider appeal will not be truly realized for another few point releases.

None of which, of course, answers the question, “Is Espresso for me?” Obviously, you won’t know until you try it out for yourself, but for those of you who like to have other people do the initial dirty work, here’s what Espresso is, what it is not, and where it’s probably headed in the near future. (Please note that I don’t have any insider info; I have been participating in the betas since slightly before they went public, however, and would like to think that my guesses are fairly educated.)

In many ways, to understand Espresso you first need to understand what it is not.

Espresso is not CSSEdit

Before you so much as think about downloading Espresso, you need to be clear on one thing: Espresso is not CSSEdit. Yes, you can edit CSS files with Espresso, but it does not offer visual CSS editing, and X-ray and the inspector are nowhere to be seen. You can override stylesheets, CSSEdit groups are supported in the code navigator, and the CSS text editing is very similar, but if you are expecting CSSEdit plus the ability to edit HTML you will be sorely disappointed.

I’m going to make a prediction here (and yes, it’s just a prediction; I have no insider knowledge): I think that Espresso will get X-Ray in a point release. I think it will probably get the inspector and the ability to jump straight from the Inspector to a style in the CSS. But I don’t think it will ever get CSSEdit’s visual editors. Why?

Because competing with yourself is stupid.

CSSEdit is the best way to edit CSS (right now, anyway). Espresso is shooting to be the best way to edit code, no matter what the language.

Perhaps someday MacRabbit might want to merge CSSEdit into Espresso and retire their original flagship product, but don’t hold your breath.

All that said, I’m as baffled as the next guy why you can’t right click a CSS file in Espresso and choose “Edit in CSSEdit”.

Espresso is not Coda

Particularly when MacRabbit announced Espresso and showed off screenshots of an integrated FTP editor I think a lot of people assumed that Espresso was setting out to be an all-in-one editor to challenge Coda (albeit much more slimmed-down). “Hooray!” cried the masses. “Perhaps at last we’ll have an all-in-one solution with a decent text editor at its core!”

The masses were a ways off the mark. Coda attempts to give you every tool you’re likely to need to edit code. Espresso tries to give you a fantastic environment for editing web pages with an extensible Sugar architecture to allow you to expand the editor to other languages. Notice how different those two sentences are.

If you love Coda because of the diverse tools that it gives you, you’ll probably be underwhelmed by Espresso. However, if the shortcomings of Coda’s text editor rub you the wrong way and you don’t very often find yourself using SVN, books, the terminal, etc., then Espresso might be a wonderful solution to your needs.

Espresso 1.0 is a foundation

In many ways, Espresso is building off the legacy of Textmate, if you can say that a piece of software that’s still nominally developed and actively used has a legacy. Text snippets with tab stops and mirrored segments directly mimic Textmate’s snippets and the Sugar syntax system is fairly Textmate-y, as well. Where Textmate provides extreme flexibility with a correspondingly steep learning curve, Espresso attempts to provide some of the core aspects of that flexibility but focus on providing users with a more polished, CSSEdit-ish application.

Espresso 1.0 is a foundation, a solid feature-set that shows the core capabilities of the program and through its scope and design may give you a good idea of what directions the application is likely to grow. When I first read MacRabbit’s descriptions of Espresso I immediately began imagining the possibilities, and every time I launch it I find myself imagining possibilities again. It has the potential to grow into an application almost as flexible as Textmate, but easier to extend and with a friendlier interface that also happens to offer the core features needed for web development.

Aside from its potential, Espresso 1.0 is a powerful text editor that’s overly focused on web design with a few rough edges tucked away beneath the overall gleam of its interface. It’s better than most of the web-centric offerings, but may not be quite good enough to lure you away from heavy hitters like Textmate, Coda, or the venerable BBEdit.

If you’re looking for a simple yet powerful web-oriented text editor with a lot of flexibility and promise for growth, I highly recommend giving Espresso a download. As long as you don’t go in expecting CSSEdit, Coda, or something that will turn into a magical unicorn and solve all your problems you should be pretty pleased with what you find, even if, like myself, you’re unlikely to be able to switch to using it full time for your day job until the application is a bit more mature.

That’s nice; what about TEA?

I haven’t been talking about TEA for Espresso much because although I’m ecstatic that it was one of the few Sugars chosen to be included in the application, it frankly wasn’t ready. I still consider it in beta even if Espresso is out, and because I didn’t know that it was going to be bundled in the application until the morning the app was released, some of its better features are broken. Once I’ve got it in a more mature place, I’ll definitely brag about it a bit more and offer some examples of how to use it; for now, please give me a shout in the Espresso forums if you have any feedback, requests, or bug reports.

Tips, tricks, and gotchas for writing bundles with PyObjC

Part of the reason that I haven’t been posting very actively to Beckism.com or Tagamac is that I’ve recently been getting exceedingly involved in a number of personal projects involving Python. Python itself is super fantastic and learning it has been a blast, but one project in particular has been causing me undue amounts of head-to-desk contact thanks to its reliance on the oh-so-cool but insufficiently documented PyObjC, and I’d like to share some of the things that I’ve discovered for other would-be programmers who want to extend their favorite Mac OS X applications with PyObjC powered plugins.

For those of you who prefer source to exposition, the project that I’ve been working on is TEA for Espresso and you can find the full source code over at the TEA for Espresso project on GitHub. As you may have surmised, it’s a plugin for the upcoming Espresso text editor created because I wanted to play with Espresso but am addicted to Textmate-style HTML actions.

My personal preference for Python is to use four spaces rather than a tab for indentation, so keep that in mind if you’re trying to execute the code samples below and your document is using tabs.

Using py2app to create semi-standalone code

Py2app allows you to work completely in Python without ever needing to boot up Xcode and touch Objective-C. There’s plenty of information around the web about how to setup a basic py2app setup.py file, but one of the things that I had to discover via trial and error was how to make my code semi-standalone.

Semi-standalone is an option you can enable with py2app that makes your code reliant on the version of Python that is installed with the OS. By default, py2app tries to bundle any dependencies for your project into your bundle, but if you’re only distributing the bundle/plugin/app/whatever to people using the same major OS version this makes for about 15 MB minimum of unnecessary junk getting tossed into your bundle.

Turning on semi-standalone is as simple as adding a key to your py2app options dictionary, but what you might not know is that you also need to enable site-packages, as well (which apparently encourages py2app to create the links to Python necessary for getting the bundle up and running, although it’s only supposed to tell it to include the system and user site-packages in the system path). So to get a semi-standalone bundle, your code needs to look something like this:

setup(
    name='My Plugin Bundle',
    plugin = ['MyPluginBundle.py'],
    options=dict(py2app=dict(
        extension='.bundle',
        semi_standalone = True,
        site_packages = True
    )),
)

One of the most frustrating aspects of working with py2app for me was the lack of any decent documentation on the main py2app site. Fortunately, there’s a much more comprehensive page of documentation available in the MacPython py2app SVN repository, which is where I discovered the site-packages option.

Automatically including project data files

Odds are since you’re using Python you’ll need to include some arbitrary data files with your application, be they NIB files, extra Python scripts and classes, or whatever else. However, py2app’s method of declaring what files you want included with your project is to list them explicitly in a data_files array. This is a major pain, since every time you add or remove a file you have to remember to edit setup.py. No thanks.

Fortunately, Python comes with some powerful file system modules that allow you to traipse around your file system, making note of files and folders as you go. The following code snippet, if included in your setup.py script, will automatically parse through a directory of files and add them to your data_files array without you needing to lift a finger (assuming that you configure the first couple variables to fit your project, that is). Files that start with a period (hidden files) will be ignored. If you’re using SVN, you may also need to add some logic to exclude folders that start with a period (TEA for Espresso is using Git, so this hasn’t been an issue for me).

The downside to using this code, of course, is that you’ll need to nest all your files in the directory structure that you want in your final bundle. So, for example, in order to include something in the Resources folder for TEA for Espresso, I have to nest it in src/Contents/Resources/ whereas I otherwise could have placed it in the root project directory. If you’re doing a simple project with very few files, it might be more worth your while to define data_files differently.

import os

# Sets what directory to crawl for files to include
# Relative to location of setup.py; leave off trailing slash
includes_dir = 'src'

# Set the root directory for included files
# Relative to the bundle's Resources folder, so '../../' targets bundle root
includes_target = '../../'

# Initialize an empty list so we can use list.append()
includes = []

# Walk the includes directory and include all the files
for root, dirs, filenames in os.walk(includes_dir):
    if root is includes_dir:
        final = includes_target
    else:
        final = includes_target + root[len(includes_dir)+1:] + '/'
    files = []
    for file in filenames:
        if (file[0] != '.'):
            files.append(os.path.join(root, file))
    includes.append((final, files))

setup(
    name='My Plugin Bundle',
    plugin = ['MyPluginBundle.py'],
    data_files = includes,
    options=dict(py2app=dict(
        extension='.bundle'
    )),
)

Avoid release statements in Python

I’m sure this is extremely obvious for anyone with significant PyObjC experience, but TEA for Espresso lay fallow for over a month after I started it because I couldn’t get the example plugin ported from Objective-C to Python. It turns out that almost everything in Objective-C can be easily ported to Python using the simple conversion rules (colons to underscores, etc.; see the PyObjC intro for more info), except for any calls to release objects. For instance, here’s the code that was breaking my project:

Objective-C
[selectedRanges release];

Ported into Python (don’t do this!)
selectedRanges.release()

PyObjC auto-releases absolutely everything, so don’t port lines like the one above. They will break your project. This is actually described in the PyObjC introduction if you’d like a more technical explanation; apparently I just missed the significance of it when I read the intro the first time.

Handling **NSError arguments

If you’re implementing a bundle that will be loaded into another application, odds are you’ll need to implement an Objective-C protocol in Python, and Objective-C functions occasionally have an **NSError parameter. If you’re not going to be returning any error information, you can safely ignore the **NSError in your Python code. The bridge automatically handles it. If you might return an error, then you may find this thread on the PyObjC-dev mailing list useful.

For example, for TEA for Espresso I needed to implement this Objective-C method in Python:

- (BOOL)performActionWithContext:(id)context error:(NSError **)outError;

Since I’m never returning any error information, in Python this translates to:

def performActionWithContext_error_(self, context):

Although woefully out of date in some respects, one of the most useful and understandable sources of information about using **NSError with PyObjC I found was Apple’s PyObjC for Developing Cocoa Apps page.

Implementing Objective-C interfaces without a protocol

An interesting problem that can arise if your bundle is implementing an Objective-C interface (rather than conforming to a protocol) is that when your code is loaded you may find that Objective-C can’t find your class methods. To solve this, usually all you need to do is explicitly define the type encoding of your class method. For instance, TEA for Espresso’s main bundle class has the following method:

class TEAforEspresso(NSObject):
    @objc.signature('B@:@')
    def canPerformActionWithContext_(self, context):

The @objc.signature() decorator tells PyObjC that this particular method returns a bool (“B”), is an object method (“@” means object, and “:” means method selector), and accepts one argument which should be a generic object (“@” again meaning object). For a full list of available encoding characters, see the Objective-C Runtime Programming Guide.

You can find more information about this bit of weirdness over at Jim Matthews Blog or, to a very limited extent, in the PyObjC class wrapping documentation.

A better bash prompt on Mac OS X

I have always disliked Terminal. I got a basic grounding in Unix command-line usage in a C++ class in college, but Terminal still bugs me. Yes, I can adjust colors and fonts in the preferences, but it isn’t the background color that bothers me; it’s the fact that I can never tell my prompt apart from my output.

This became particularly aggravating when I recently started using Git. Git, unfortunately, does not have a great GUI client on the Mac that I’ve found, so I was doing all my work on the command line and determining where the prompt ended and output began was getting to be a persistent problem. I also was not happy with the fact that almost any command besides a simple cd or ls was wrapping onto multiple lines; the default Terminal prompt just takes up so much horizontal space.

Fortunately, it is possible to modify your bash prompt, and having trolled the internet and tested various solutions, here’s what I’m currently using to distinguish prompt from output:

My very own terminal prompt

Yes, my computer is named Tastefully Delicious. I myself am not entirely certain how this occurred.

My custom prompt isn’t perfect, and it’s certainly a lot more basic than some that you can create, but it does a great job of visually distinguishing between input and output which is exactly what I needed. Fortunately, it’s not terribly difficult to enable something like this; although bash prompt examples around the internet range from gibberish to hundreds of lines of cryptic functions that you have to load into your bash session, understanding the basics of a custom bash prompt in order to make your own peace with Terminal is quite simple.

First off, head over to IBM’s cheat sheet for bash prompt modification. This was by far the best reference I found on modifying the prompt, and offers a complete listing of available bash sequences and colors (as an added bonus, it uses a much simpler syntax for colors than some other sites advise). In my examples below I’ll be using the specific variables for my personal prompt, but you can of course substitute any bash sequence that you like to make the command line your own.

There are two main parts to customizing your prompt: deciding on the right prompt declaration for you, and then writing it to a file so that it’s loaded every time you load bash. The prompt is stored in the PS1 variable in bash, which you can examine like this:

echo $PS1

To temporarily change the variable (for instance, while testing out various prompts), you’ll run something like this:

export PS1="Your prompt here > "

By adding bash sequences to your prompt, you can make it display more interesting information. For instance, if you wanted to use just the second line of my prompt (what folder you’re in, what computer you’re logged into, and what user account you’re using), you could enter this:

export PS1="\W @ \h (\u) \$ "

Which would result in a prompt that reads something like this:

A somewhat modified prompt

You can, of course, use any of the sequences listed on the IBM reference. For myself, I found that changing the content of the prompt itself wasn’t enough (even when I experimented with multi-line prompts); what was really needed was some color.

Colors in bash are rather offputting, but easy enough to use as long as you’re careful. The basic format is \e[0m — “\e[” starts the color code, 0 is the actual color declaration (0 specifically means “reset to default”), and “m” ends the color. However, in order to make sure bash wraps things right (should they need wrapping) you have to add some backslash-escaped brackets to mark the code as taking up no space on the line:

\[\e[0m\]

Fun, illegible times. In the color chart on IBM’s reference, you can see the various codes associated with different colors. To setup a specific color combination, separate different numeric color codes with semicolons (so far as I know, order doesn’t matter). So if you wanted red text on a black background you would use \[\e[31;40m\] and if you wanted bold green text on a blue background you’d use \[\e[1;32;44m\] (the number 1 makes the text bolder and/or brighter for use on a dark background). You can also leave off any of the color codes (to just set the background color without messing with the default text color, for instance).

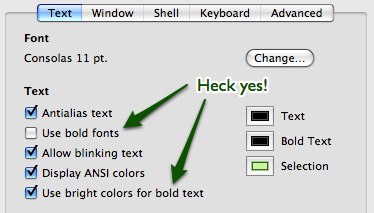
For my prompt I wanted something more subtle than most of the bash colors provide for, so I set the background of the whole window to light gray in the Terminal preferences, and then used the code \[\e[1;30;47m\] which set the text to the bright variant of black on a white background. I wasn’t too happy with the bold text, but fortunately Terminal offers a pair of options to disable bold text and make it “bright” which worked perfectly for me:

Terminal preferences

With colors worked out, the last step was adding a horizontal rule (via underscores) to separate out the prompt even more. My default Terminal window is 80 characters wide, so I just tossed in 80 underscores. I’m certain there are ways to get tricky with functions and only output as many underscores as you need to fill the window, but that seemed like more effort (and processing overhead) than it was worth.

So without further ado, my complete custom bash prompt:

export PS1="\[\e[1m\]________________________________________________________________________________\n\[\e[1;30;47m\]| \W @ \h (\u) \n| => \[\e[0m\]"

There’s additionally a second level prompt that you may need if you’re entering a command over multiple lines. I just duplicated the final line of my original prompt for the secondary one:

export PS2="\[\e[1;30;47m\]| => \[\e[0m\]"

For both of them, note the “return to default” color code at the end; if you don’t enter that, you’ll end up with an entire window the color of your prompt, which will likely defeat the purpose.

Once you’ve found a prompt that you like, you’ll want to save it so that it automatically loads. To do this, just add the export commands to a hidden file in your home folder named either “.bash_profile” or “.bashrc” (I don’t have any idea what the difference is; I’m personally using .bash_profile because it already existed in my home folder).

Once you’ve saved your path to the file, you should forevermore experience a more visually appealing (and possibly informative) bash prompt, hopefully rendering Terminal a less painful program to use.

Our first Christmas tree

Our first Christmas tree

My girlfriend’s and my first Christmas tree together. Happy!

Sitting on the couch we’ve got a view of the Christmas tree with the Space Needle standing tall in the window next to it. I love this apartment.