MobileMe email settings for Palm Pre

For the record, I finally bit the bullet and ditched my iPhone for a Palm Pre last week, and I’m extremely happy with the switch. I’ll post in more detail about why the Pre (and particularly WebOS) is freaking fantastic soon, but for now here’s a quick tip for other Palm Pre owners who want to configure their Pre to use MobileMe and can’t figure out why it keeps claiming you’re doing it wrong.

Although some people have apparently had luck using the automatic setup (where you just enter an email address and your password), I needed to use the manual setup in order to get it to use IMAP rather than POP. I think recent MobileMe accounts don’t even have POP activated by default, so maybe the age of my account is the problem. In any case, if the automatic setup booted you into POP3 rather than IMAP, delete the account and recreate it. From the screen where it asks for your username and password, open the menu and choose “Manual Setup” (why they didn’t just stick a Manual Setup button on the main screen where anybody could find it is beyond me, but I digress).

Here’s all the settings you’ll need to get rolling:

  • Incoming mail server: mail.me.com
  • Username: [your username, without @me.com or @mac.com]
  • Password: [your password]
  • Encryption: SSL
  • Port #: 993 (this should be automatically selected when you choose SSL)
  • Outgoing mail server: smtp.me.com
  • User Authentication: On
  • (Username and password will be auto-filled)
  • Encryption: TLS (this is what was probably screwing you up if you tried manual setup already)
  • Port #: 587

These settings work perfectly for me; hopefully they’ll save other Pre users with MobileMe the headache of “SMTP setup failed” errors.

Understanding Espresso actions

A fair number of people in the Espresso forums ask questions like, “Is there a shortcut to delete the current line the way there is in Textmate?” Usually the answer is, “No, why don’t you create one?” Yet people remain leery of creating text actions by hand. I understand that; heck it’s extra work, and who wants that? What I think most people don’t realize is that, particularly for text manipulations like deleting the current line, the amount of work is minimal. All you need is a basic understanding of how Espresso works and the ability to author simple Javascript and XML.

Anatomy of an action

Espresso actions come in two parts:

  1. The XML definition, which tells Espresso the action’s title, what Objective-C class to execute when the action is invoked, and additional information like keyboard shortcuts or tab triggers that should invoke the action.
  2. The Objective-C class (or, if using a plugin like TEA or Spice, the script that defines the action’s logic)

Most often, XML action definitions are included with a Sugar (you can make a Sugar for custom text actions simply by adding a .sugar extension to a folder that contains a TextActions folder with the action XML files in it). If you wish, you can also define action XML files outside of a Sugar by enabling TEA custom user actions in the Advanced pane of the Espresso Preferences (more info about TEA custom user actions).

As of Espresso 1.1 there isn’t an in-program GUI for editing actions yet, but hopefully that will come in time.

Spice up your actions

Spice is an Espresso Sugar that I’m currently developing that provides access to the Espresso API using Javascript (thanks to JSCocoa), and additionally provides a selection of utility classes that allow you to interact with the API without needing to know anything about Objective-C or the JSCocoa bridge.

The benefits of this should be fairly obvious, but there’s another reason creating actions with Spice is easier than using TEA or Objective-C; not only are the action scripts not compiled, but you don’t need to relaunch Espresso to see your changes. When I’m coding a Spice action, I usually open the Javascript action in Espresso, and then run the action right there on the Javascript when I need to test it.

Although Spice’s utility classes make creating custom Espresso actions easier, you still need a basic understanding of how the Espresso API works.

Contexts, ranges, recipes, and snippets

When a user invokes an action from the Actions menu, Espresso executes the action’s class and sends it an object representing the text or file context (depending on whether you’re using a text or file action; I’ll be focusing only on text actions because the file action API is currently underwhelming). The text context allows you to access the active file’s text, information about the selection (or selections, since you can select multiple things at once), line information, preferences (like what line ending or indentation is being used), and access to the syntax system.

When you are ready to change some text in the file, your action messages the text context and tells it what to change and how to do it.

As of Espresso 1.1, the easiest actions to create are ones that are invoked by the user, access and change something about the active file’s text, and then immediately exit. It’s possible to do things that are a bit more complicated or on-going, but at the moment Espresso doesn’t make it easy.

When you’re working with text, you’ll mainly be dealing with ranges. A range represents a section of text in the active file and is composed of a location and a length. Internally Espresso keeps track of text by counting all of the characters in the active file starting at zero, so the range location is the index of the starting character and the length is the number of characters contained within the range. Typically you’ll be dealing with selections, so you’ll have ranges like {0, 10} (the first ten characters in the file) or {100, 30} (characters 100 through 130). However, it’s also possible to have ranges like {10, 0}, which represents the cursor location at character index #10 in the file.

A typical text action will fetch the currently selected ranges from Espresso, manipulate the text within them somehow, and then tell Espresso to change the range(s) accordingly. In order to queue up changes like this, you’ll use text recipes.

Text recipes are something that is unique to Espresso, so far as I know. Basically, you create a recipe and tell it things like “delete the text in this range”, “replace the text in this second range”, and “add this text at a third range”. You can compose a multiple step recipe without worrying about tracking how ranges will change; for instance, if you add characters to an early range, you don’t have to adjust the location of later ranges. Instead, the recipe does that for you when you apply it to the document.

Text recipes allow you to make complex changes to multiple ranges in the active file, but you can instead insert text snippets, as well. A text snippet is a specially formatted string that allows Espresso to create tab stops, mirrored segments, and more after you’ve inserted it. Many of the custom actions bundled with Espresso are little more than text snippets; for instance Wrap Selection In Tag merely grabs the selected text and wraps it in a simple snippet that mirrors the HTML element from the opening tag to the closing tag. You can do some pretty magical-seeming things with very simple actions simply through tricky use of text snippets. The one downside to keep in mind for text snippets, however, is that you can only insert one at a time (unlike text recipes, you can’t insert multiple text snippets over discontiguous selections).

Bringing it all together

With an understanding of how the Espresso API works and a quick peek at the Spice docs, setting up an action to delete the current line (to take one example) becomes simple enough:

  1. First, we’ll need to define an action in XML, and create a Javascript file with the action logic
  2. In the Javascript, we’ll need to query the text context to get the range of the current line, and then create a text recipe to delete that range

The action XML is easy enough; simply create the file Actions.xml and place it either in a Sugar’s TextAction folder or in your Espresso Support folder located here:

~/Library/Application Support/Espresso/Support/TextActions/

The contents of the action XML definition should be this:

<action-recipes>
    <action id="com.onecrayon.DeleteLine" category="actions.text.generic">
        <class>Spice</class>
        <title>Delete Line</title>

        <setup>
            <script>delete_line</script>
            <undo_name>Delete Line</undo_name>
        </setup>
    </action>
</action-recipes>

(If you wish to add a keyboard shortcut, you can do that with the key-equivalent entity; see the Spice action XML docs.)

If you’re using the Support folder option, you’ll need to enable TEA custom user actions in the preferences and restart the program twice. Otherwise you’ll need to make sure the Sugar is installed and restart the program once (action XML definitions are loaded when Espresso boots up; unfortunately as of Espresso 1.1 there isn’t a way to refresh action XML definitions without a relaunch).

Now that you’ve got the action defined (and showing up in the Actions menu) you can create the Javascript file delete_line.js (referenced in the script element of the action XML). If you are using a Sugar, it should be located here:

MySugar.sugar/Support/Scripts/

If you’re using custom user actions in the Espresso Support folder, you’ll save it here:

~/Library/Application Support/Espresso/Support/Scripts/

The simplest way to delete the current line would be this:

// Deletes the current line

// require() allows you easy modular access to Spice's helper classes
var textContext = require('text_action_context').textContext;
var TextRecipe = require('text_recipe').TextRecipe;

// exports.main is your primary function, run automatically by Spice
exports.main = function() {
    // Grab the range of the current line
    var linerange = textContext.rangeForLine();
    // Run the actual removal
    return new TextRecipe().remove(linerange).apply();
}

First, the script uses the universal require() function to include the Spice utility object textContext (which contains methods for interacting with the Espresso text context) and utility class TextRecipe (which allows access to Espresso text recipes).

Spice’s utility classes are provided in a modular system that allows you to only require what you need in order to run your action. Spice modules have the following naming conventions:

  • The module is named for the primary class, converted to lowercase and with underscores between words (so primary class TextActionContext becomes module text_action_context)
  • Classes are all camel-case with the first letter capitalized (TextActionContext)
  • Objects (instantiated versions of a class) are camel-case with the first letter lowercase (textContext is an instantiated version of TextActionContext)

You can see what a given module exports in the Spice docs (along with full references to the object methods available). The text_action_context module is one of the few that exports an object as well as the class, since you’ll never need more than one object for referencing the text context.

Once you’ve saved the Javascript file, you’ve officially created your first Espresso action! You can immediately run the action from the Actions menu, and it will delete the current line. If you test it out, though, you may notice that the action behaves differently when you delete the final line in the document; instead of removing the line completely, it only removes all the text. To fix this, you could modify the action like so:

// Deletes the current line

// require() allows you easy modular access to Spice's helper classes
var textContext = require('text_action_context').textContext;
var TextRecipe = require('text_recipe').TextRecipe;
var Range = require('range').Range;

// exports.main is your primary function, run automatically by Spice
exports.main = function() {
    // Grab the range of the current line
    var linerange = textContext.rangeForLine();
    // If on the last line of the doc, remove the line break prior to the line
    // This isn't strictly necessary, but it's nice to have
    if (textContext.lineNumber() != 1 && textContext.rangeForLine(textContext.lineNumber() + 1) === false) {
        linerange = new Range(linerange.location - 1, linerange.length + 1);
    }
    // Run the actual removal
    return new TextRecipe().remove(linerange).apply();
}

The only addition is some logic to check if we’re on the last line of the document, and if so create a custom Range object that includes the linebreak from the previous line.

Debugging

As you work on your own custom actions, you will of course run into problems and errors. The best way to debug is to keep Console.app open (located in your Applications/Utilities folder), since most errors will be output there. You can also use the globally available system.log('message') to output directly to the console. Many Spice utility classes also include a log() method to quickly log the contents of an object.

When using Spice, keep in mind that it’s still under development (at the time of this writing, it’s at version 1.0 beta 6). If you run into something that seems buggy or a limitation of the utility classes, please let me know.

Parting thoughts

Even if you don’t use Spice, the basic strategy for adding a custom action to Espresso remains the same. TEA offers several alternative methods to creating text actions (from Python scripts with full access to the API to scripts in arbitrary languages like Ruby or PHP that have more limited capabilities). Although the basic editor has a nice interface and some great features, I’ve found that the extensibility of Espresso is what keeps me coming back for more. A modicum of effort is often all that’s required to add a custom text action, so there’s little excuse for not giving it a try if you find yourself missing functionality you’ve grown used to in other editors.

If you do write any great custom actions, please think about sharing them either via a Sugar, GitHub, or the Espresso forums! I’d also love to hear how people are using Spice; I’m still planning out the additions I want to make now that I’ve got most of the basic Espresso API for text actions covered by the utility classes, so your input is extremely valuable.

When the formula falters

My girlfriend and I went to see The Princess and the Frog last night, and it was fun. Not great, but fun. Unfortunately Disney has managed to capture the spectacle but little of the soul of past great Disney movies (which is mildly ironic, given the movie’s setting). The Princess and the Frog was exquisitely executed (beautiful animation, great voice acting and characters, high-energy music) but something was missing, a core component that left the movie feeling ever so slightly flat.

My first inclination, comparing the film with my Disney favorites Little Mermaid, Beauty and the Beast, and Aladdin was that Princess and the Frog had used those prior movies as a formula and that was what was jarring. Upon further thought, though, I realized that the use of a formula wasn’t the problem; I’d never noticed before Princess and the Frog made me think about it, but Little Mermaid, Beauty and the Beast, and Aladdin follow strict formulas themselves. Heck, they’re practically the same movie:

  • The movie opens, and shortly after introducing the main characters our heroine (or hero, but most of them are female for this particular sampling so for simplicity I’ll stick with the feminine) is brought to the villain’s attention. The villain reveals that the heroine has something that makes them uniquely important to the villain’s personal goals (Ariel is the key to Triton’s power, Belle is the only girl worthy of conquest, Aladdin is the only one who can gain the power of the lamp)
  • Early on, our heroine reveals their core motivation via song (Part of Your World, Belle’s opening song, One Jump Ahead)
  • A spectacular musical number reawakens our interest (Under the Sea, Be Our Guest, Friend Like Me)
  • At some point, the villain has a lone musical number, partially spoken or otherwise not as melodic and memorable (Gaston’s song being something of an exception, likely because he’s more of a passive antagonist otherwise so they had to compensate somewhere to make him interesting)
  • Various filler songs occur here and there, typically to advance the plot
  • A love song occurs at the primary moment one (or both) of the love interests realize their feelings (or otherwise reach a turning point in their relationship)
  • A showdown occurs with the villain, the heroine triumphs, and the culmination of their triumph is the marriage to the love interest and achievement of their dreams

You can break the formula down even further past the musical numbers to specific characters (villain’s humorous sidekick, heroine’s non-human helpers, etc.), but you get the idea.

It wasn’t that The Princess and the Frog followed a formula, then, that impaired the movie. In point of fact, the way it nails almost every aspect of the Little Mermaid/etc. formula may well be its greatest strength. Disney obviously brought a lot of budget and creativity to bear to bring the movie to life in the same vein as their old hits (even making the comparison explicitly in their previews, which is what cued me into comparing the two as I was watching it). Yet unlike Little Mermaid or Aladdin I didn’t walk out of the theater wanting to see it again, or utterly captivated by the characters, or excited and eager to tell my friends about the movie. I came out of the theater and thought, “Well, that was fun. Don’t really need to see it again.”

I’ve been pondering, and come to the conclusion that what the Disney movies of the early 90’s that I remember so fondly had that Princess and the Frog lacks is the spark, the soul, the story that needs desperately to be told. Without that inspiration, the formula falters, the pieces pull slightly apart, and the viewer is left with the realization that there is a formula and that it isn’t quite working.

Great movies happen because creative people get excited, and if they’re lucky they have the budget and direction they’ll need to create something fantastic. I think that people got excited about Princess and the Frog, but I don’t think that it was because of the story that drives the entire project forward. I think they got excited about the spectacle, the fun characters, and the setting. And in the end, that made the difference between a film destined to be a classic and one that is merely diverting.

The more near misses I see in the theater the more I’ve come to believe that story is the driving creative force that must exist for any narrative work to succeed, be it cinema, literature, or otherwise. Certainly, great characters are a part of the puzzle. A well-tested formula can help clarify and ease the story’s delivery. Talented people well directed can breathe a lot of life into any tale. But unless these things are born out of a story that needs to be told the pieces won’t quite snap into place.

The Princess and the Frog is not a story that needed to be told. It’s a decent story, an amusing story, a story that pleasantly reinforces our own delusions about ourself and our culture; but it isn’t a story that needs its telling so badly that it grabs the imaginations of its makers and viewers alike and refuses to let go even once the curtain has closed.

I don’t know where stories come from, or even how crafted and calculated the Disney movies of yore that I loved might have been behind the scenes. All I know is that in Princess and the Frog Disney has produced a film that sparkles, amuses, and tweaks gently at the heartstrings yet fails to achieve the vivid life bequeathed by story.

Wrap Selection In Link in any program on Mac OS 10.6

The Mac OS X Services menu got a serious bit of love for 10.6, but until now I haven’t really played around with it. Today, however, I finally got around to trying it out, and for the first time since I started using OS X years ago, Services are actually becoming useful for me.

The specific need I wanted to address was my inability to easily insert some common HTML elements (particularly links) in WriteRoom. I’ve owned WriteRoom for years thanks to a software bundle, but I never had any use for it until I discovered QuickCursor. Now I can’t get enough of it; full screen editing for text fields in Safari is brilliant.

The only thing I haven’t been happy about was needing to type out every blessed character when I needed light HTML. Although WriteRoom’s Applescript support does not apparently provide access to selected text, the new Services menu does.

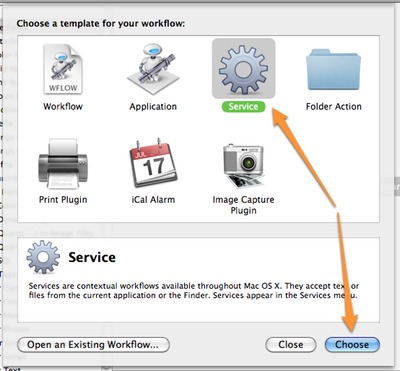
To add HTML link insertion to WriteRoom (or any other text editor that supports Services, for that matter) first boot up Automator and create a new Service workflow:

service_workflow.jpg

By default, Automator will have you processing selected text in any application. Check the “Replaces selected text” checkbox, and if you’re only going to be using the action in WriteRoom (or similar application) make sure to use the dropdown to target that app and avoid cluttering up your Services menu:

service_config.jpg

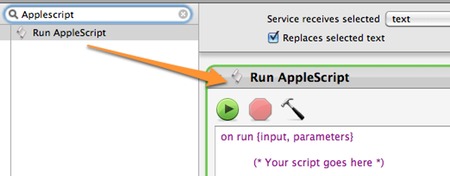
Over at the top right, type “Applescript” in the search box to filter the list for the “Run Applescript” action (make sure you have the Library highlighted, or it may not show up). Drag the action into your workflow:

services_action.jpg

Select everything in the text box, and replace it with this:

on run {input, parameters}
    set linkDefault to (the clipboard as string)
    set linkDefault to my switchText(linkDefault, "\\\"", "\"")
    set targetLink to do shell script "echo \"" & linkDefault & "\"|sed -E \"s/(mailto:)?(.+@.+\\..+)/mailto:\\2/\""
    if targetLink does not start with "mailto:" then
        set targetLink to do shell script "echo \"" & linkDefault & "\"|sed -E \"s/^(([a-zA-Z0-9-]+\\.)*[a-zA-Z0-9-]+\\.[a-zA-Z]{2,4}(\\/.*)?)/http:\\/\\/\\1/\""
        if targetLink does not start with "http" then
            set targetLink to "http://"
        end if
    end if
    
    return "<a href=\"" & targetLink & "\">" & input & "</a>"
end run

on switchText(fromText, targetText, replaceText)
    set d to text item delimiters
    set text item delimiters to replaceText
    set fromText to fromText's text items
    set text item delimiters to targetText
    tell fromText to set fromText to item 1 & ({""} & rest)
    set text item delimiters to d
    return fromText
end switchText

Save your workflow, and you’re basically done! When you select some text in WriteRoom or elsewhere and run the action from the Services menu, it will wrap the text with a link. It also will check the clipboard to see if there’s a recognizable email address or URL on it, and if so will use it for the link (otherwise defaults to http://).

For maximum productivity benefits, of course, you’ll want to visit the System Preferences Keyboard pane and give your new Service action a shortcut; I’m using control-shift-L since that’s what I’m used to from Textmate and Espresso.

Worth noting is the fact that the above Applescript doesn’t display a dialog box to query you for a URL if it can’t detect one on the clipboard, so for maximum effect you’ll want to copy your target URL prior to running the action if possible. The reason for this minor problem is that the dialogs spawned by my Service action never received focus, and for myself mousing over to give the dialog focus is more work than option arrowing a few times to edit the default URL.

You can, of course, add simple Service actions to surround text in other arbitrary HTML tags, as well. Simply use an Applescript similar to this instead:

on run {input, parameters}
	return "<strong>" & input & "</strong>"
end run

The only major downside that I’ve found of using Services this way is that it isn’t as quick as I’d like. I experimented with using shell scripts or Python instead of Applescript, but there were no significant speed boosts; as best I can tell, however Services is harvesting the selected text and then replacing it afterward is simply a slow process.

I’d love to hear how other people are leveraging the new 10.6 Services menu! I have the feeling that I’m just scratching the surface with this script.

Comparing StoryMill and Scrivener

I’m a long-time user of StoryMill (starting when it was originally called Avenir), but I’m also something of a software junkie, so when Scrivener came out I tried using it for a few projects. Particularly now that StoryMill has a timeline view (as of this writing the only Mac creative writing software to implement the feature) and Mariner Software is distributing it, it seems like a more and more people are wondering whether they should use StoryMill or Scrivener.

Well, here it is: my definitive StoryMill vs. Scrivener review. Although StoryMill is my personal application of choice, there’s a lot to love (and some things to dislike) about both programs.

Quick and dirty

Not everyone wants to wade through my periphrastic meanderings (just discovered that word, and it’s making me really happy; sorry for sounding like a total vocab snob), so here’s the quick and dirty:

  • If you primarily write fiction and want a program that will provide you with an easy framework for organizing your writing, you’ll probably prefer StoryMill.
  • If you primarily write non-fiction or screenplays or write fiction and want a program that will let you do pretty much whatever the hell you want workflow-wise (with a correspondingly higher level of confusion), you’ll probably prefer Scrivener.

A broader picture

As is often the case, the fast and dirty comparison is a bit misleading: either program can help you write fiction or non-fiction. The reason the fiction/non-fiction comparison is common is because StoryMill is explicitly focused on fiction (and doesn’t support screenplays at all, since that would steal sales from its companion software Montage) while Scrivener provides a general writing metaphor that can apply to either genre equally well (with limited support for screenplay formatting and footnotes).

The truth is that regardless of your genre the deciding factor for which software to use will be a matter of style. StoryMill’s approach is to provide you with a specific framework for writing and organizing, complemented with a focused group of powerful features. In contrast, Scrivener is much more flexible and offers a larger number of features that you can pick and choose from to form your workflow. You can do most of the things in Scrivener that you can in StoryMill (with a few key exceptions), but it will be slightly more effort.

If StoryMill’s framework makes sense to you and you don’t have an urgent need for any of the features that are Scrivener-only, then StoryMill will be the easiest environment to write in. However, for some people the time necessary to set up their own framework in Scrivener is well worth the effort because the program’s flexibility allows them to write most effectively.

To figure out which style, and thus program, is the best choice for you, you’ll need to consider two big questions: what metaphors do you use for writing, and what specific features are most important for you?

StoryMill: a novel framework

The foundation of StoryMill’s approach to writing and organizing is the scene. Scenes in StoryMill are the building blocks which create chapters and ultimately the story itself (it’s worth noting that you can think of scenes and chapters as whatever content blocks make sense for your story; the names don’t really limit the function). Though you’ll track your characters, locations, and so forth elsewhere, the scenes are where you’ll tie them together.

StoryMill offers several other types of items like characters, locations, research, and even submission tracking for when you complete the novel, but the scenes are the core of the program. If working with scenes makes sense to you, and you like the ability to directly relate characters to scenes and organize both in plot order and chronological order (the latter via the timeline feature), then StoryMill will likely appeal.

This scene-centric framework has actually taken a page from Scrivener’s book in recent updates, as well. You can use scenes either as an outline (in the Scenes view) or as the actual text of the story (in the Chapters view). Storing text in scenes can be a little bit confusing (particularly since you can still store text in chapters and use scenes purely for organization if you choose), but this allows you to take advantage of the outline-as-text feature that Scrivener executes with such panache.

StoryMill also has some specific stand-out features that influenced my decision to use it. For me, annotations are one of the biggest. In StoryMill, you annotate text by selecting it and choosing “Annotate”. The text turns the standard link blue with underline, and a little window opens up in which you can type the annotation’s title (defaults to the selected text) and add your annotation. This is great for a number of reasons:

  1. Annotated text is clearly marked, yet the annotations themselves are completely invisible unless you want to see them.
  2. Annotations are rich text, so they can contain just about anything. This includes images, formatted text, etc.
  3. StoryMill handles annotations intelligently: if you open up the annotations window and start moving through the text with your cursor, the displayed annotation will update based on which linked text the cursor is in. You can also open the annotations window for a given annotation with a hotkey (no clicking the link required).

Some people prefer the margin-notes approach to annotations in Pages, Word, etc., but I find those extremely limiting because if you type more than a sentence or two they become unwieldy, it’s not always easy to tell what text the annotation applies to, and you can’t have very many on a page before they get out of control. The only thing they have over StoryMill’s annotations is that you can view all of them at once, but in practice I’ve never found this to matter.

Another big draw for StoryMill is its timeline functionality. Timelines allow you to view and organize scenes in chronological time, even if the flow of the novel is completely different. This can be fantastically helpful for preventing plot holes and other inconsistencies, and getting a general overview of the flow of time through your novel can be useful in its own right. The downside to timeline is that it’s still a young feature; the interface could use a little refinement and it had a bit of a rocky start thanks to some bugs, but there’s still nothing comparable out there (aside from dedicated timeline software).

StoryMill has numerous other small features that I can’t live without, as well: the progress meter is a one that I’ve surprisingly grown to rely on. It visually tracks how far along you are for both your session and project word goals. It also can emit a sound when you hit your session goal, which is really nice feedback if you’re working in full screen. Full screen is of course another great feature, although one that’s available in most writing software these days. The reason I like StoryMill’s better than Scrivener’s is that it’s truly nothing but you and your writing; no annotations, no floating windows, nothing but the text. Tags and smart views, export templates, and the project-wide find and replace dialog are other reasons to love StoryMill.

Scrivener: your digital corkboard

Scrivener takes a slightly different approach to the writing process. Where StoryMill provides a framework with carefully designed parts, Scrivener offers the user a beautifully executed corkboard metaphor and then hangs potentially useful features around it.

Scrivener’s corkboard is where it really shines. The connection between outline, visual organization of “index cards”, and your actual text is simple, sensible, and flexible enough to handle virtually any kind of writing. Want to break things down into beats, then scenes, then chapters, then acts? Go for it. Your only real limit is your creativity. Scrivener’s central metaphor additionally captures in a digital format a way of working that instantly makes sense to most people who have written by hand. This is a definite strength over StoryMill, which takes a more relational database-driven approach to organization and writing that may not be as easy to initially access for some people.

Aside from its elegant central metaphor, Scrivener also offers a slew of useful features. I encourage you to check out the Scrivener website and free trial to figure out which ones you’ll care about, but the primary things of interest to me are snapshots (saving multiple versions of a single piece of text), wiki-style links to internal documents, the vastly flexible exporting system, and the simple script-writing formatting tools.

It’s worth taking a moment to dwell on snapshots. Although StoryMill is planning to implement similar functionality for their next version, this is a key area where Scrivener is clearly the better choice. Organizing multiple revisions of the same text in StoryMill is extremely kludgy at the current time, while Scrivener handles it with ease.

Additionally, you can (with a little bit of work) mimic some of StoryMill’s strengths in Scrivener. For instance, the Document References could be used to associate characters with scenes. You can also mimic StoryMill’s annotations to some extent using wiki-links that open in split views (Scrivener’s built-in annotations are inline with the text, making them only useful for very short notes to yourself that you don’t mind reading every time you go back over things). They’re not as easy to use as StoryMill annotations, sure, but this kind of flexibility is another of Scrivener’s strengths. The menus may be confusing and (to my eye) bloated, but all those disparate features mean that with a little work you can achieve numerous different workflows.

Beyond the software

Of course, there’s more to writing than just the software itself. Both Scrivener and StoryMill have healthy communities and refreshingly responsive developers. Scrivener has a larger community (and one more inclined to chat about whatever the heck is on their minds), but you may get a faster response in StoryMill’s forums simply because there aren’t as many threads. Your mileage will doubtless vary, but I highly suggest dropping by the forums for whichever software you’re leaning toward and asking any questions you have.

An additional concern is interoperability between your writing software and other software on your computer. Both Scrivener and StoryMill store data in proprietary formats but both also offer flexible ways to export that data. Which export system you like better will probably depend a lot on what you need to export, but both allow you to get all of your data out of the program without much fuss. If you’re trying either software’s free trial, definitely play with the export system before purchasing it.

Scrivener additionally allows easy editing of text in external programs, which can be nice if you like editing text in WriteRoom, BBEdit, or similar.

Time to write

Both StoryMill and Scrivener were created because the developers couldn’t find a tool that fit their respective needs as authors, and the bottom line for any potential user is you should use whichever program makes it easiest for you to write.

For myself, that program is StoryMill. Its framework makes sense to me and I’ve become addicted to its overall slimmed-down focus on the features that matter most (not to mention some specific niceties like rich annotations and timelines).

I can certainly appreciate the draw of Scrivener, however. Every time I open it I’m amazed anew at how simple and relevant a metaphor for writing it provides. StoryMill’s niggling issues with the separation between outline and text are nonexistent in Scrivener thanks to its solid basis in the idea of a corkboard. Sure, to get the kind of interconnectivity that StoryMill encourages you have to do a bit more work, but with Scrivener’s large and helpful community figuring out a document layout and workflow shouldn’t be too painful.

Ironically, in a few short years we’ve gone from having no great alternative writing environments to Word and the other word processors to having a difficult choice between two strong contenders (and that’s discounting the scads of similar but less popular software like CopyWrite, Jer’s Novel Writer, Storyist, or Ulysses, the program that started it all); no choice has exploded into too much choice. Hopefully by focusing on which general approach and specific features are most helpful for your workflow you’ll be able to select the best software for you and get on to what’s really important: your writing.

StoryMill and NaNoWriMo

Although I find my current work as a web designer interesting and occasionally fulfilling, it is not what I want to do the rest of my life. Since I was a snot-nosed kid in fifth grade, I have instead set my sites on being a novelist. I know that I’m capable of writing a novel (learned that thanks to my senior thesis), but up until now my writing has been very haphazard. I’ll write on vacations (sometimes) or when the mood strikes, but anyone who has tried to write a novel knows that you’ll never get anything done doing that. To write a longer work, writing has to be a habit, and I’ve been finding it a difficult habit to form.

So this year, I’ve decided to finally jump on the National Novel Writing Month (NaNoWriMo) bandwagon in the hopes that the experience will help me settle into some good writing habits, like writing every morning instead of poking around listlessly online. I will, of course, be writing in StoryMill because I can’t fathom writing in any other software (and yes, I’ve tried pretty much all of the ones available for Mac).

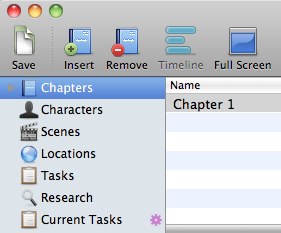
But upon opening StoryMill and prepping a new document for the fast upcoming November 1st, I realized that my typical approach to writing in StoryMill simply isn’t going to work for NaNoWriMo. In order to finish 50,000 words in 30 days, on top of a full time job and other distractions, I’m going to need to write, write, write. Outlining, character backstory, notes on locations, research—all of these will be distractions that could well prevent me from reaching the goal, and yet all of these things are tasks that I regularly undertake in StoryMill. In fact, the program encourages it; take a look at its default novel document:

StoryMill's default document setup

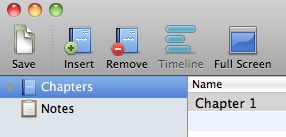
This is no good at all. Keeping track of characters, scenes, etc. is certainly useful, but I’m going for pure word output, and if the option to procrastinate by expanding on my backstory is available, I’ll probably take it. So to start, I decided to axe absolutely everything except the generic Tasks view, which I renamed to Notes (to delete and rename these items right click a view in the sidebar and choose Manage Views; then when you’re done, right click the smart view and choose Remove View):

sm_slimmed_down.jpg

I can add those views back in when it comes time to clean things up, and in the meantime I can drop any notes on backstory or whatever into the Notes view as I think of them without feeling any pressure to expand on the ideas. Will my story have more plot holes and inconsistencies than if I’d left those views in? Doubtless. But darn it, I want to win NaNoWriMo! I cannot afford distractions.

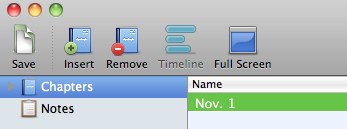
sm_chapter_naming.jpgNext up, I took a look at the chapters view. I definitely am going to want to write my text in Chapters (the chapters editing window, which you can get to by double clicking a chapter title in the list area, offers numerous incentives like highlighting and annotations that aren’t as easy to use in other views). However, worrying about where my chapter breaks fall is going to slow me down and distract me yet again. I suppose I could just write in a single long chapter, but it would get difficult to manage quickly. Instead, I think I’ll add a new chapter every day. That way I can not only see how many words I was able to write in retrospect (which could be useful info), but I’ll have the story broken up into easily skimmable chunks if I need to go back over it to remember someone’s name or whatever.
Just to prevent any temptation, I also right-clicked on the Timeline button in the toolbar and chose “Remove Item”. Sure, it would never have been activated because I don’t have a scenes view, but the temptation to add a scenes view would be there.

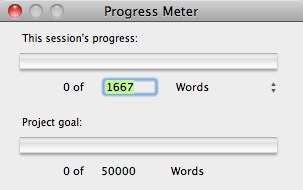
Last, but certainly not least, I double clicked the Progress Meter and set my goals appropriately:

sm_progress.jpg

And with that, I’m ready to start writing, as distraction-free as I’m likely to get. I’m sure this system won’t work for everyone (heck, it might not even work for me; I’ve yet to test it out), but my hope is that by slimming down StoryMill to the bare essentials I’ll be able to get my first draft in there as part of reaching the NaNoWriMo goal of 50,000 words, and then I’ll be able to add features like the scenes view, characters, and locations back when I get ready to revise so that I can start cleaning up plot holes and putting a little more thought into the novel. Plus, needing to copy and paste all of my text into scenes will be an excellent excuse to read over it all as part of my revision efforts, anyway.

For other NaNoWriMo participants planning to use StoryMill, here’s a few generic tips to help you out:

  • Full screen will likely be your best friend. You can enter full screen quickly from just about any part of the program by hitting command-option-F. Exit full screen by hitting escape.
  • As I mentioned above, the Chapters window is probably the best editing experience in StoryMill (aside from full screen). Double click a chapter in the list or sidebar to see what I mean.
  • If you’re using a slimmed-down project like I will, you’ll probably also want to avoid spending much time adding tags to things. However, if you drop something in the Notes view it would be a good idea to toss a couple quick tags on it to make sorting through things later easier. For instance, a note about a character could get a “character” tag. Then when it comes time to add the characters view back in you can make a smart view based on notes to filter for all character items and hit the ground running.

Good luck to the other NaNoWriMo participants!

I am crap at networking

I went to the ExpressionEngine Roadshow today where I learned a couple things, was disgusted with EllisLab for their cop-out non-presentation, and awkwardly stood alone in the corner (or, worse, the center of the room) between speeches while people around me did this thing called “networking”.

I am such crap at networking. I’ve only attended two conferences so far (An Event Apart and EE Roadshow), but at both I came to the conclusion that the presentations aren’t what the thing’s about. Both times only about half of the presentations were remotely worthwhile, while the others were either senseless cruft or so bogged down by the speaker’s fear of public speaking and/or inability to write coherently that by the end I just wanted to bang my head into the nearest wall a few times. Clearly we aren’t here because web developers are charismatic individuals with a flair for speech-writing.

So I can only assume that it’s the times in between, the meal times and parties, that people find the real value. Those times when you’re expected to wander around, get to know your fellow developers, swap business cards, and talk shop.

Sadly for me, I have no interest in approaching complete strangers and introducing myself. I’ve never had this inclination, which is something that puzzles me. Engage me in conversation, and you’ll find I’m not socially awkward: I am, in fact, an intelligent individual with a good sense of humor who loves interacting with people. Observe me with a group of my friends or family, and you may think me highly extroverted. Yet drop me in a room full of strangers, and I clam up instantly. I know these people are passionate about the same things I’m passionate about, but unless one of them seeks me out I find it hard to think of things to talk about.

I was thinking about this on the bus ride home (I left early, having deduced from fifteen minutes standing around alone that I wasn’t going to get anything out of the after-party, particularly since I don’t drink and thus could not take advantage of the free alcohol), and I’ve finally realized the problem: I’m a presenter. A performer. I’m damn good at giving a speech and then talking to people about it afterward, but no good at being just another member of the audience, milling around and networking.

Problem being, of course, that in both the EE community and the web development community as a whole, I’m a nobody. I haven’t written any books, or published any extensions, or been hired by Happy Cog so it’s unlikely anyone is going to invite me to speak anytime soon.

Guess it’s time to either start the difficult personal work necessary to overcome my awkwardness at initiating social encounters or start submitting topic proposals to my favorite web conference organizers.